Getting Started
Create an account
- Open the app and tap Sign up
- Enter your email and choose a password
- Pick a username (you can change it later in Settings)
- Accept the terms of service
Log in
If you already have an account, tap Log in and enter your credentials. Check “Remember me” to stay logged in.
Import a book
- In the Library tab, tap the + button (bottom right)
- Select an
.epubor.ereadfile from your phone - The app automatically analyzes the content (this may take a few minutes for long novels)
- Your book appears in your library with its cover
.eread files are enriched EPUBs created by Ember Read: they contain the book text plus a pre-computed intensity analysis (heatmap, keywords, tension curve). The result: no waiting for analysis — immersion mode is available as soon as you open the book.
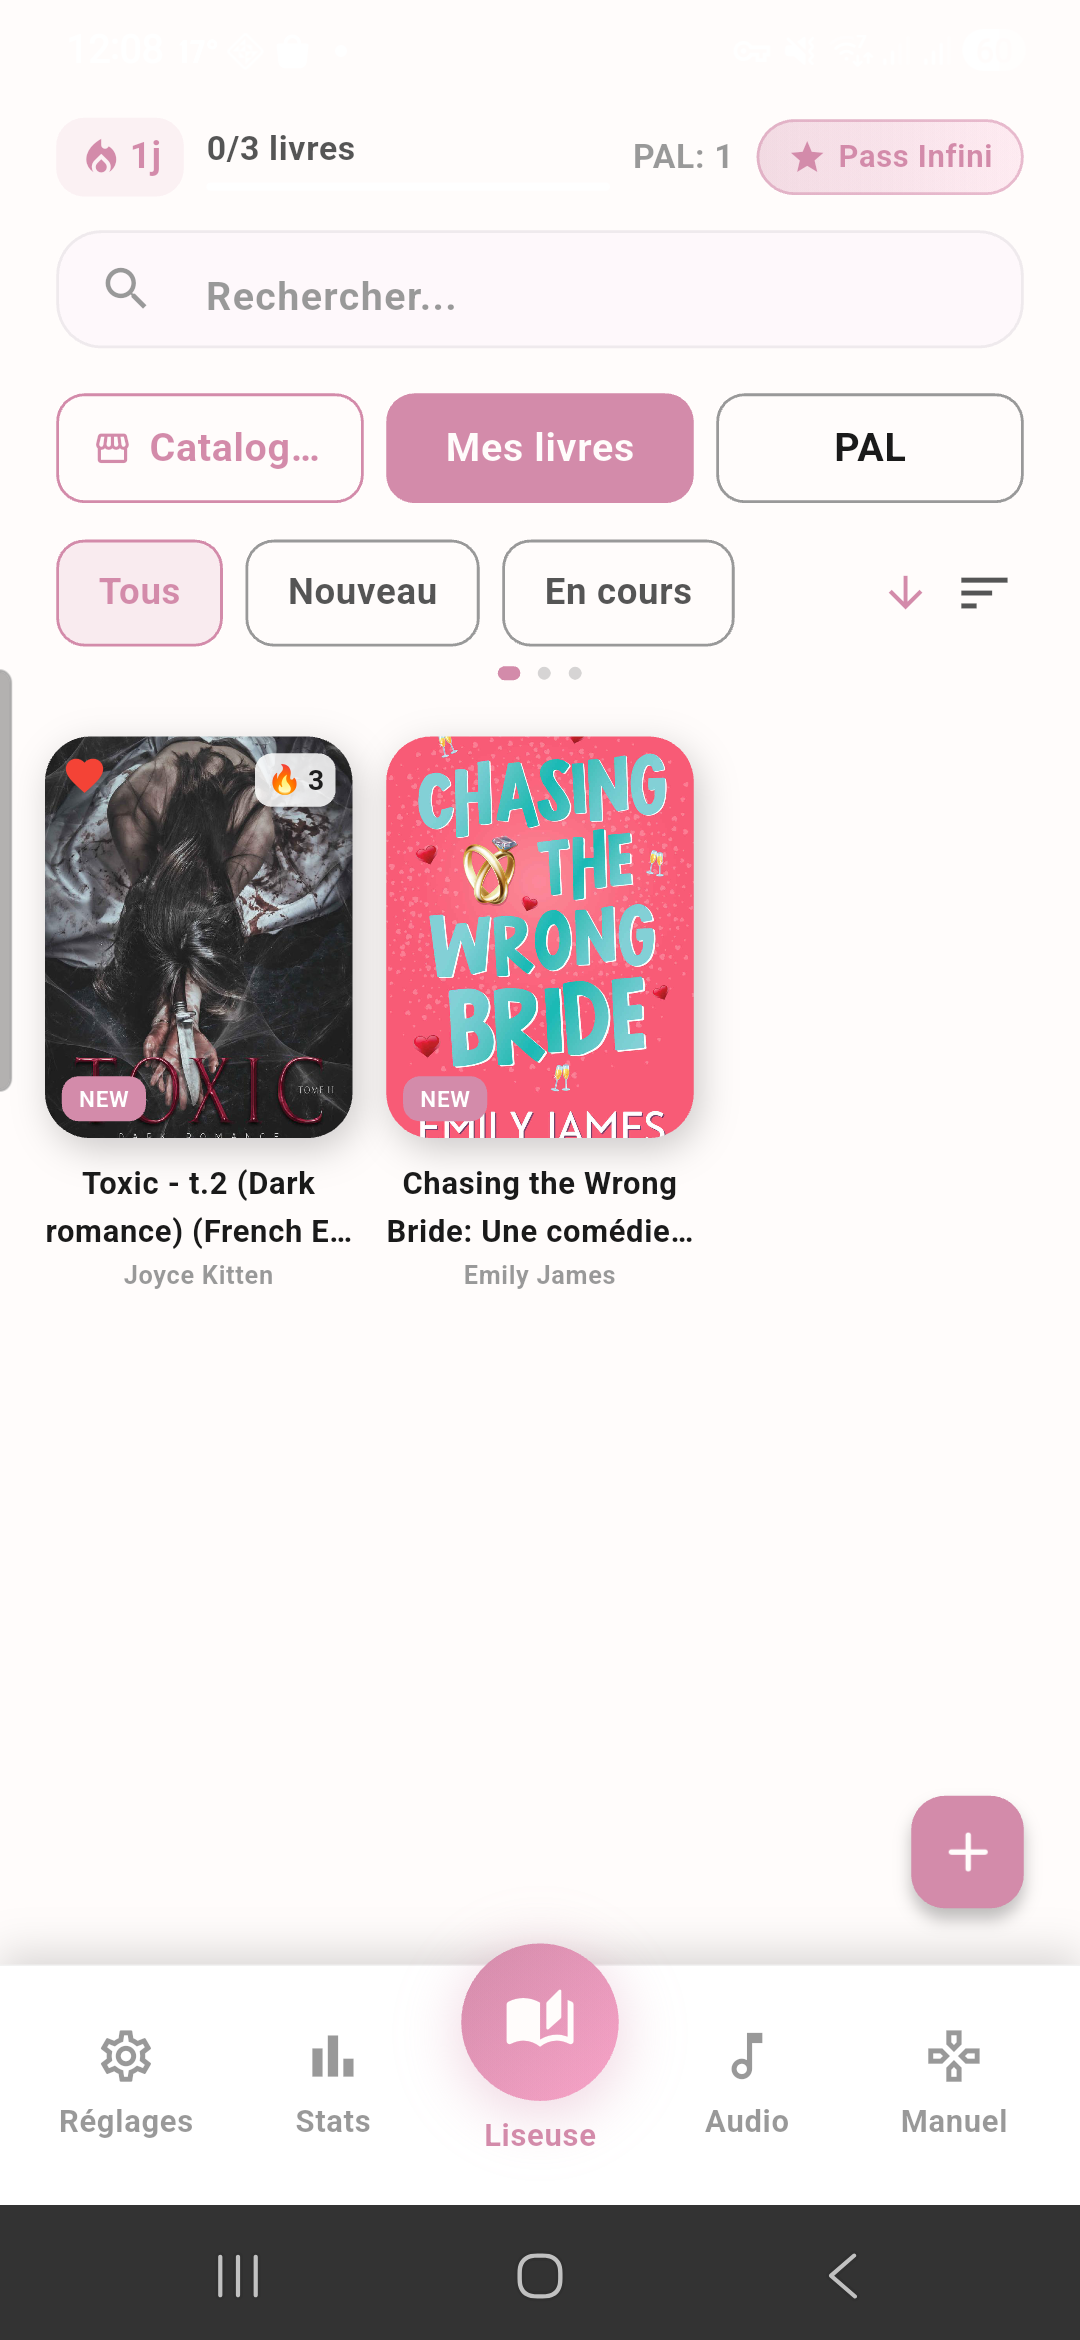
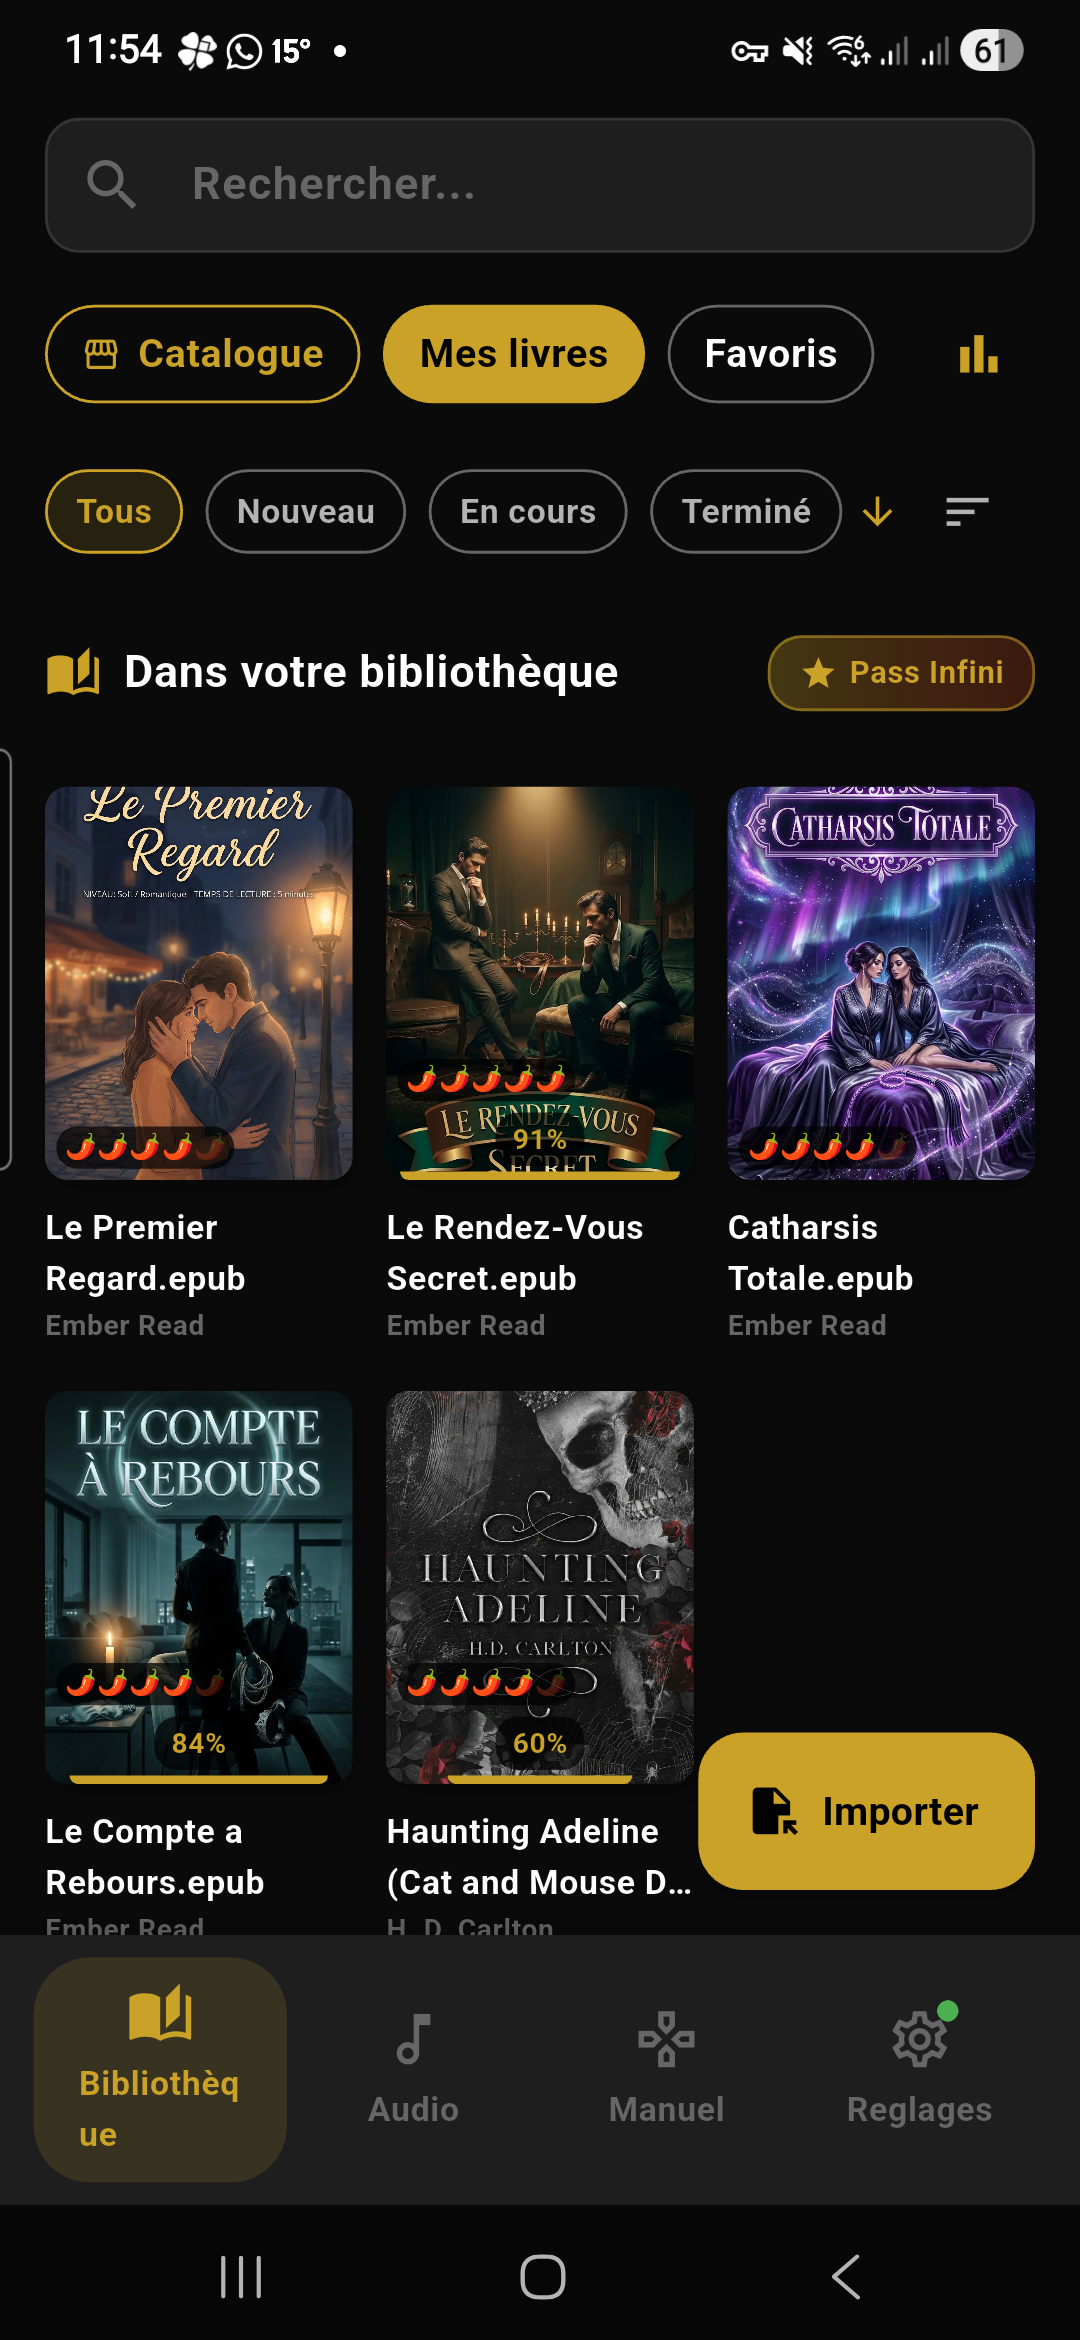
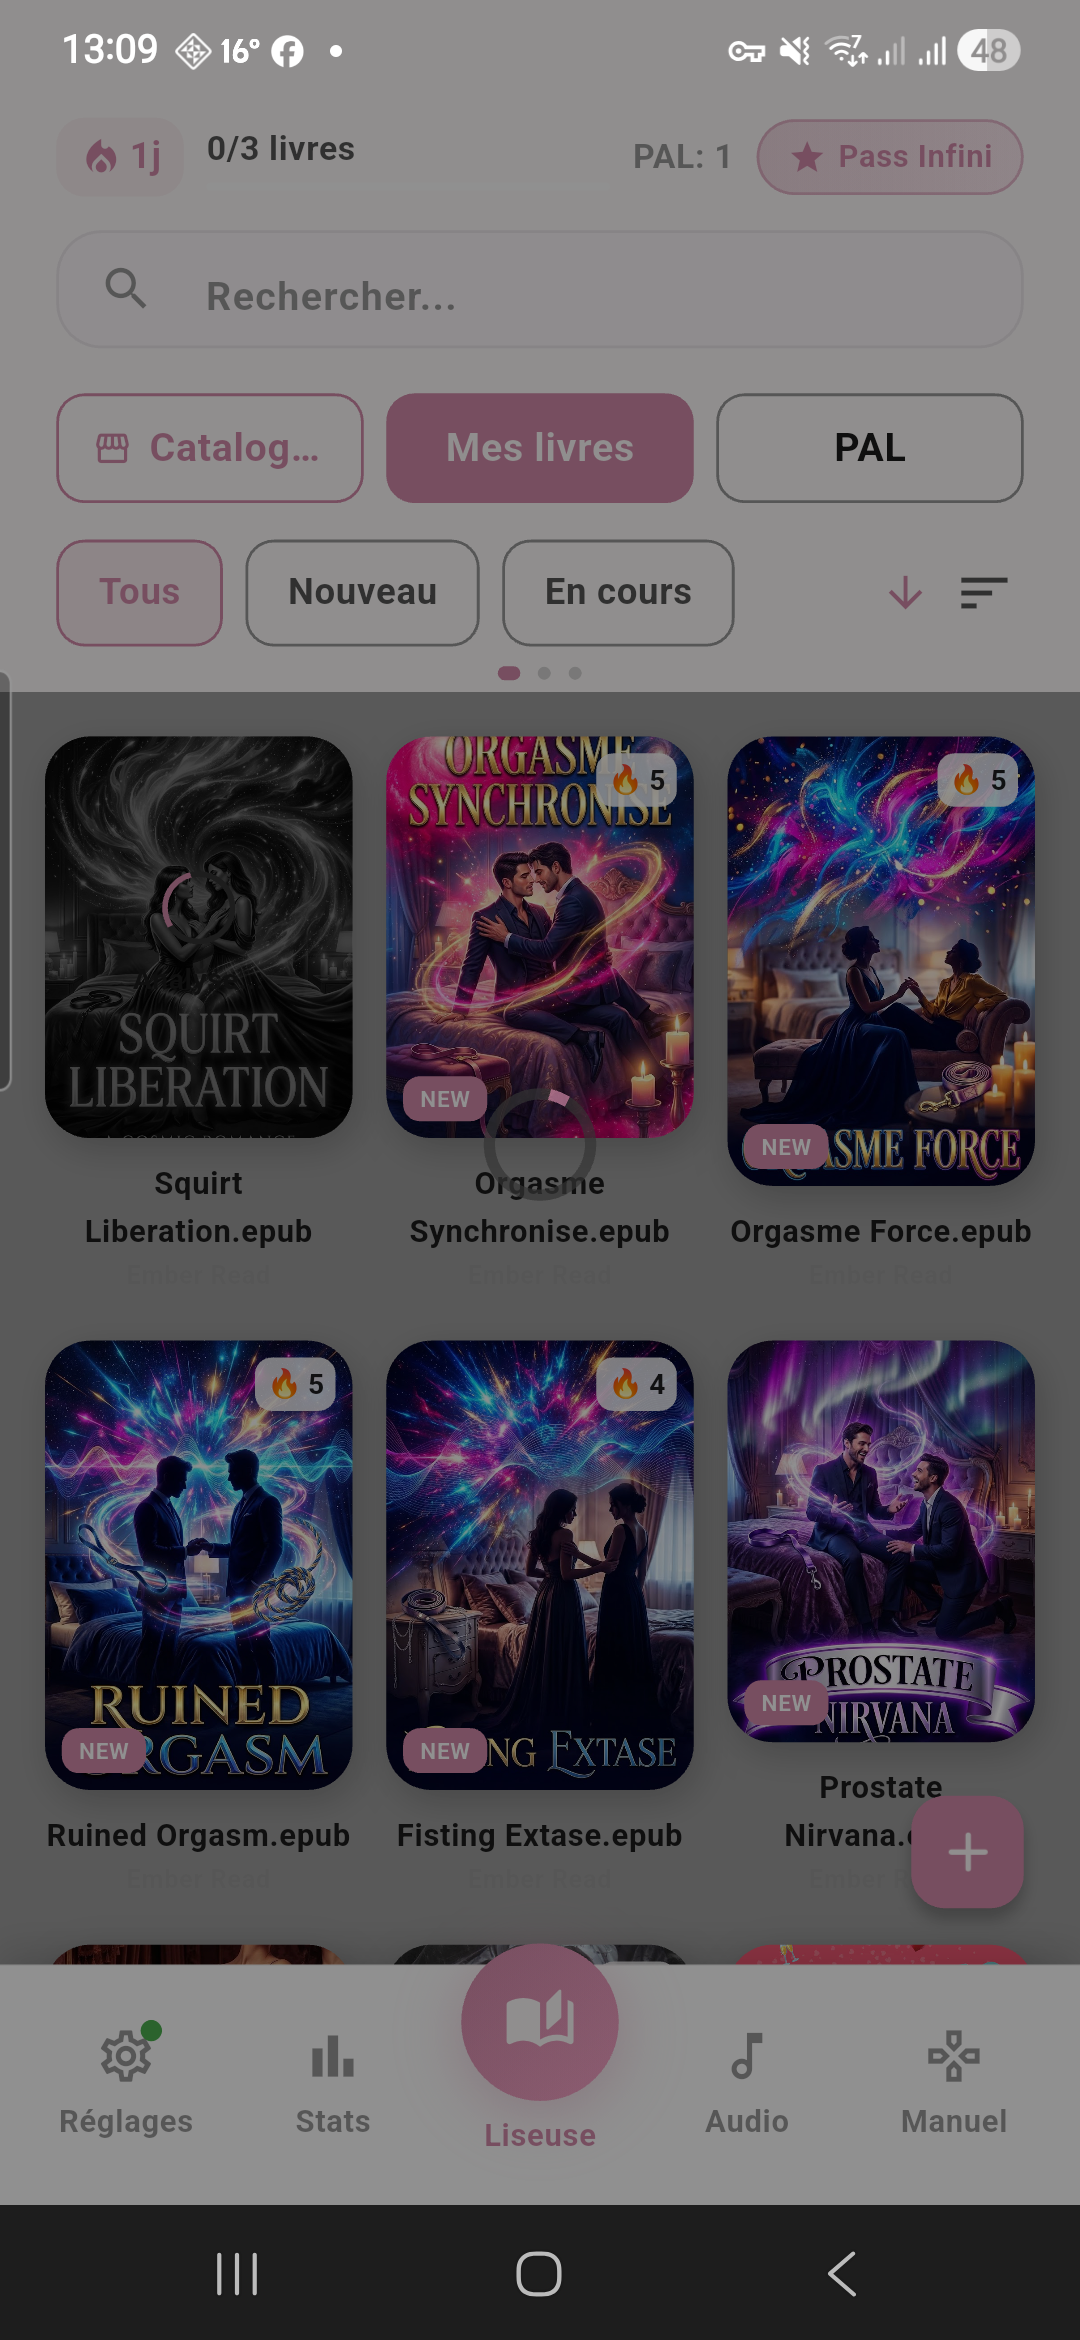
The Library
Dynamic header
At the very top of the screen, an information bar displays four indicators:
| Position | Element | Details |
|---|---|---|
| Left | 🔥 Streak X days | Number of consecutive days you have read at least one page. Tap it to go directly to the Stats tab. |
| Center | 📖 X/Y books | Progress toward your monthly goal (set in Settings > Library > Monthly goal). The bar fills up as you go. Tap it to change the period. |
| Center-right | TBR X | Number of books in your To Be Read list (favorites + BookTree items). Tap it to open the monthly goal setting. If your TBR is empty, the text appears in italic gold “No TBR”. |
| Right | Premium badge | Shows “Unlimited Pass” (gold badge) if you are subscribed, or “X credits” otherwise. Tap it to access the Subscription page. |
Below the header, two icons are visible:
- 🔍 Magnifying glass (BookTree): opens the BookTree scanner to discover books via AI — see BookTree section
- 🕓 Clock (BookTree History): access your BookTree scan history
The 3 tabs
Just below the header, three tabs organize your library:
| Tab | Content | Details |
|---|---|---|
| My books | All your imported books | This is the default tab when you open the app. It displays all your EPUB and .eread books, with their cover, progress, and badges. |
| Favorites | Your To Be Read list (TBR) | Contains books you have marked as favorites (via long press > “Add to favorites”) and books discovered through BookTree that you added to your TBR. BookTree items display links to retailers (Fnac, Amazon, etc.). |
| Collections | Your custom folders | Create up to 10 collections to organize your books. Each collection has a name and shows how many books it contains. Tap a collection to view its contents. |
A “Catalog” button appears at the end of the tabs: it opens the Ember Read catalog to discover and add new books.
Search bar
Below the tabs, a search field lets you filter your books in real time by title or author. The search is instant: each keystroke refines the list. Tap the X to the right of the field to clear the search and return to the full list.
Sort and filter
Below the search bar, filter buttons let you refine the view:
| Filter | Options | How to use |
|---|---|---|
| Reading status | All, New, In progress, Finished | Tap one of the buttons. The active filter is highlighted in gold. Tap again to deactivate. |
| Pairing | FM, FF/Sapphic, MM/Gay, MFM, FFM, Reverse Harem | Filter books by relationship type. Only one pairing active at a time. Tap again to deactivate. |
| Spice level 🌶️ | 1 to 5 | Filter by intensity level. 1 = soft, 5 = steamy. |
| Sort | Date added, Author A→Z, Title A→Z, Spice level | Tap the ↕ Sort icon to change the display order. The active sort is indicated by an arrow. |
List / grid view
At the top right of the filter area, a button toggles between two display modes:
- ▦ Grid view (default): covers are displayed in 3 columns. Each thumbnail shows the cover, spice badge, and progress bar.
- ☰ List view: each book appears on a single line with a cover thumbnail on the left, and the title, author, and progress on the right.
Your choice is remembered: the app will return to the same display mode the next time you open it.
Your books
Each book in the library displays several pieces of information:
- Cover: the cover image extracted from the EPUB
- Spice badge 🌶️: from 1 (soft) to 5 (steamy), at the top right of the cover, on a semi-transparent white background. Indicates the book’s overall intensity level.
- ❤️ Favorite heart: at the top left of the cover. Appears when the book is in your favorites (TBR).
- Progress bar: below the cover, a thin gold bar shows your reading progress as a percentage.
- “NEW” badge: at the bottom left, gold background, white text. Shown on books added less than 7 days ago that have never been opened.
- “READ” badge: at the bottom left, round green dot with a white checkmark. Shown on books completed (100%).
- “TRIAL” banner: diagonal banner at the top right (gold if active trial, gray if expired). Appears on free trial books.
- Analysis badge: during initial book analysis, a circular “Analyzing...” indicator is displayed over the cover.
- “DISCOVER” badge (BookTree TBR): at the bottom left, orange background. Identifies books discovered through BookTree and added to your TBR (Favorites tab only).
The catalog
The Catalog tab (button to the right of the tabs) lets you browse Ember Read books:
- Books are organized by category and filterable by pairing
- Each book displays its cover, title, author, and spice level
- Books already in your library are marked (you cannot add them twice)
- Unlocked books require a credit or the Unlimited Pass to activate immersion mode
Collections
Create a collection:
- Go to the Collections tab
- Tap the + New collection button
- Give it a name (e.g. “Dark Romance”, “To re-read”, etc.)
- The collection appears in the list with 0 books
Add a book to a collection:
- In the My books tab, long press on a book cover
- In the context menu, tap “Manage collections”
- Check the desired collections (a book can be in multiple collections)
- Tap “Confirm”
Delete or rename: in the Collections tab, long press on a collection name to rename or delete it. Maximum 10 collections.
TBR (To Be Read)
The Favorites tab is your To Be Read (TBR) list: it gathers the books you want to read next.
Add a book to your TBR:
- From the library: long press on a book > “Add to favorites”
- From BookTree: when you discover a book via AI, tap “Add to TBR” — the book will appear in your favorites with retailer links
BookTree items in your TBR display purchase links (Fnac, Amazon, Cultura, etc.) so you can buy the physical or digital book.
Actions on a book
“+” import button
The floating + button at the bottom right of the screen opens your phone’s file picker. Select an .epub or .eread file to import it into your library.
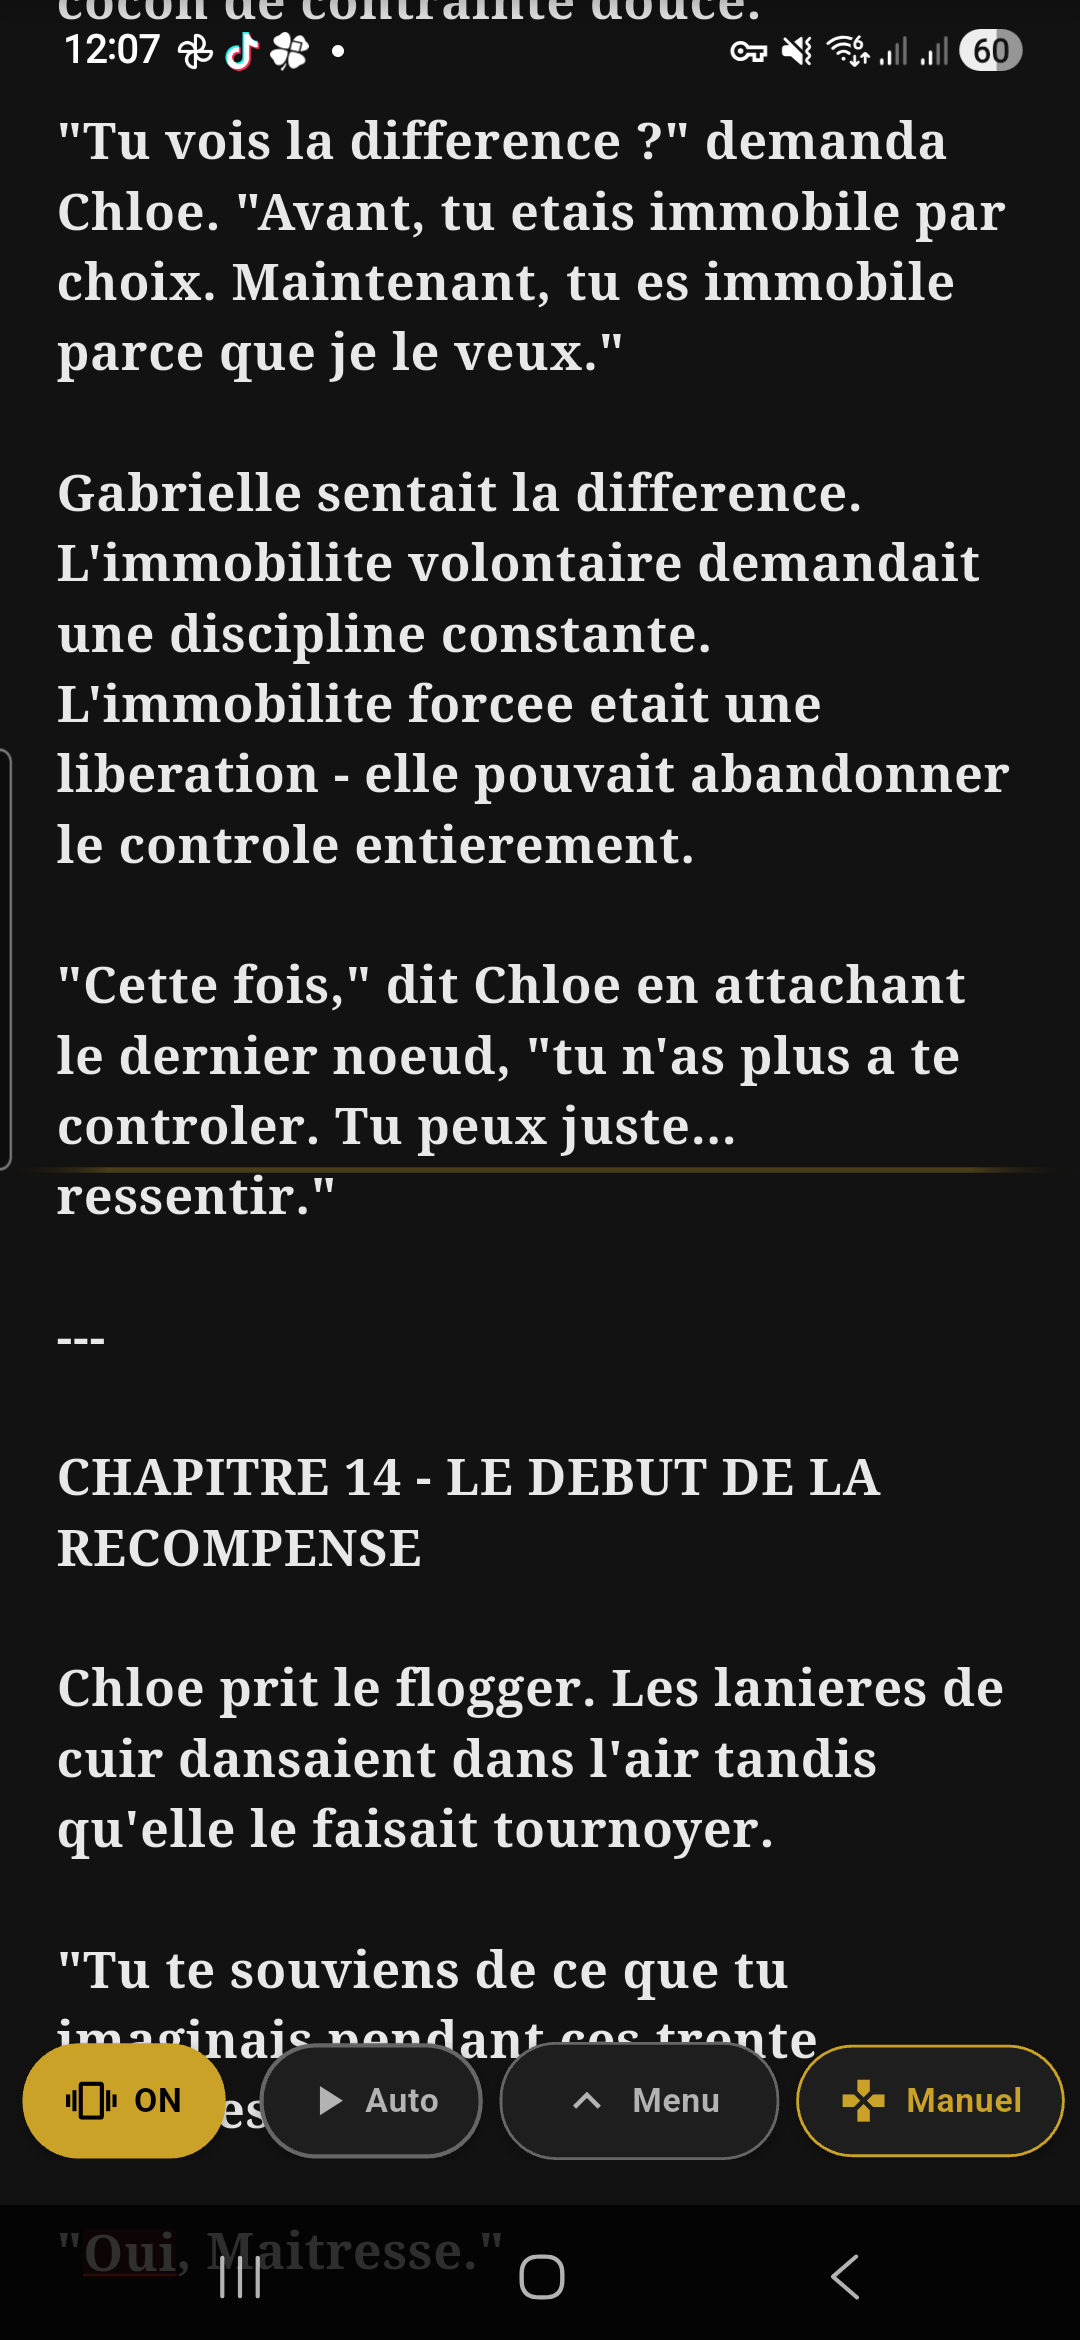
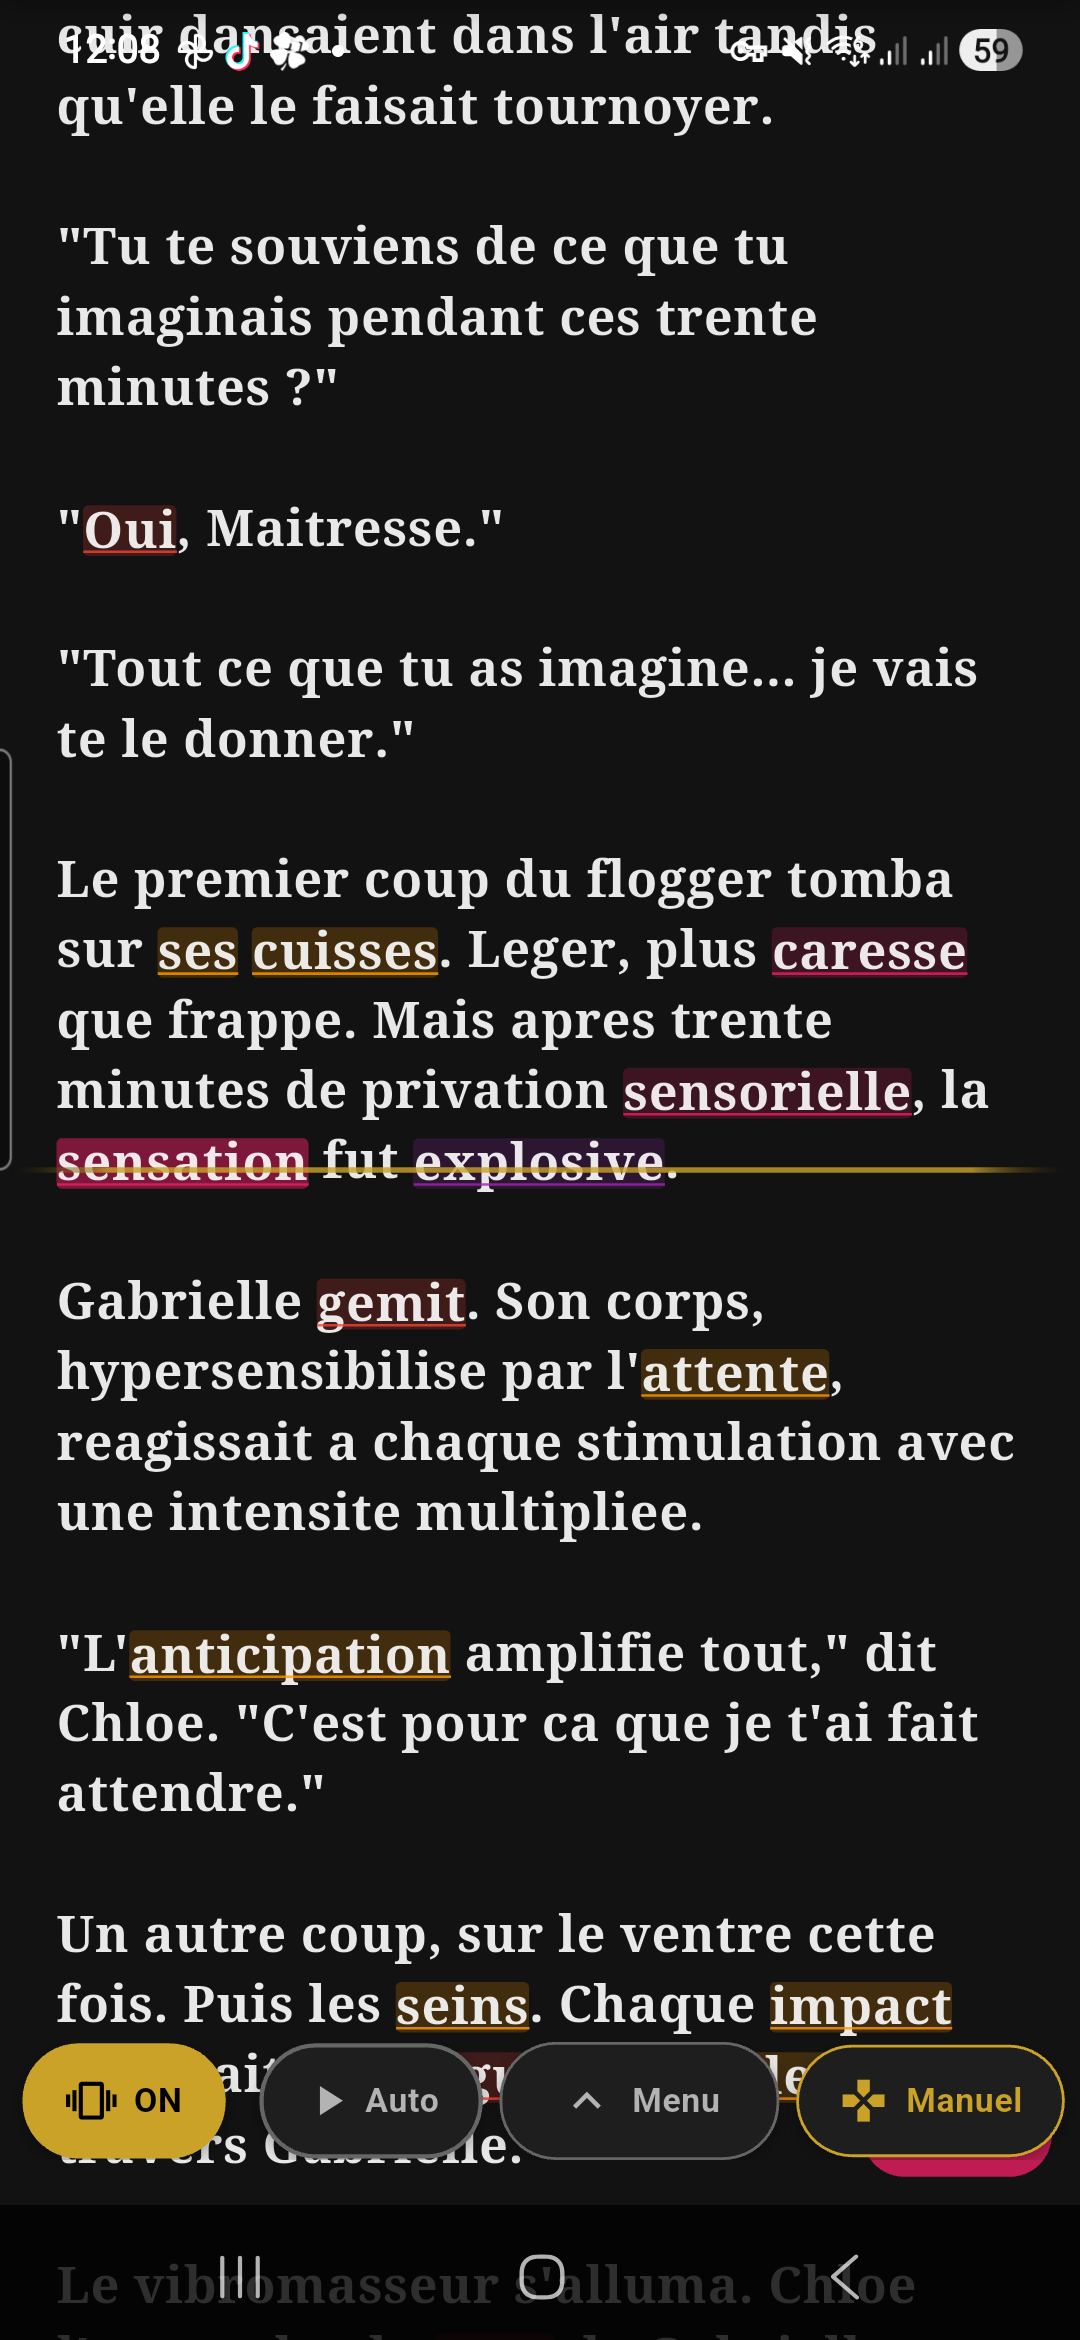
The Reader
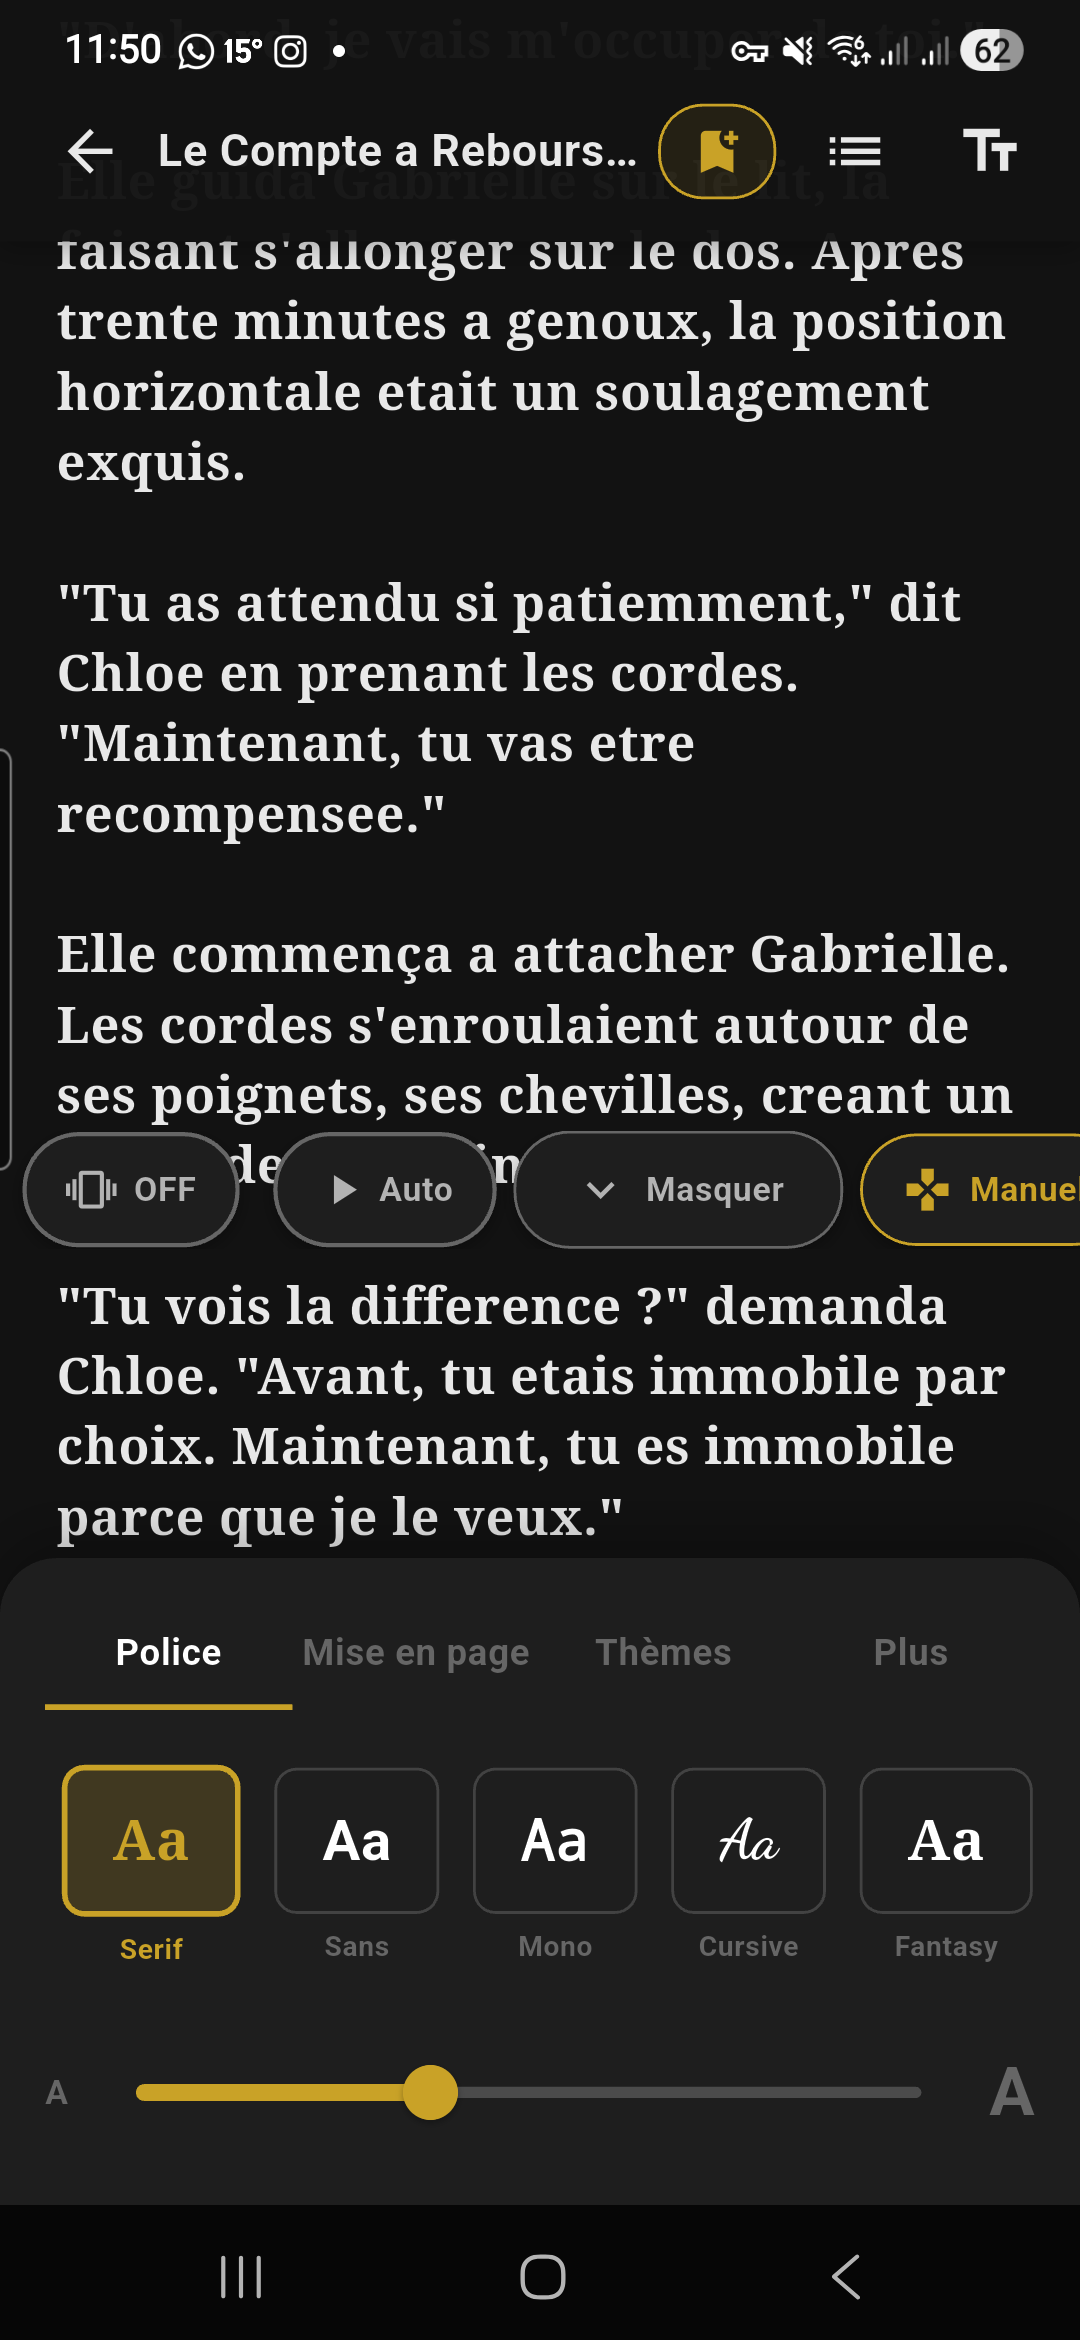
The reader displays your book text in continuous vertical scroll. Your progress is saved automatically with every scroll. A reading line (a thin horizontal mark on the left edge) serves as your reference point: this is where the current word is detected for vibrations and TTS.
Opening the menu
Top bar
The top bar contains 6 buttons, from left to right:
| Icon | Button | Action | Details |
|---|---|---|---|
| ← | Back | Leave the book and return to the library | Progress is saved automatically before exiting. |
| (Book title + “Chapter X/Y”) | Information area | Displays the book title in bold and the current chapter number in gray below it. | |
| 🔍 | Search | Opens the in-text search bar | See Search section below. |
| ✏️ | Annotations | Opens the Notes & bookmarks panel | Displays the unified list of all your bookmarks and highlights for this book. See Panel section below. |
| 🔖 | Bookmark | Add or remove a bookmark at the current position | Tap: adds a gold bookmark (or removes it if one already exists). The icon switches from “+” to “−” when a bookmark is present. Long press without bookmark: opens a 5-color picker to choose the bookmark color before adding it (gold, pink, mint, sky blue, lavender). Long press with bookmark: opens the Notes & bookmarks panel directly. |
| ☰ | Chapters | Opens the table of contents | Lists all chapters in the book. Tap a chapter to jump directly to it. The current chapter is highlighted. |
| Aa | Reading settings | Opens the settings panel | See Text settings section below. |
In-text search
- Tap the 🔍 magnifying glass icon in the top bar
- A search bar appears at the top with an input field
- Type a word or phrase: results are highlighted in yellow in the text
- The result counter appears to the right of the field: “X/Y” (e.g. “3/15” = 3rd match out of 15 found)
- Use the ▲ up arrow and ▼ down arrow buttons to navigate between matches — the text automatically scrolls to the next result and the counter updates
- The active match is highlighted in a different (brighter) color than the others
- Tap the X to close the bar and clear all highlights
Bottom bar — overview
The bottom bar is the reader’s control center. It works with a compact/expand system:
Compact mode (menu closed)
When the menu is closed (no center tap), you always see:
- Progress bar: a thin gold line showing your position in the book. The gold cursor (round dot) indicates your exact position. You can drag the bar to navigate quickly.
- Page info: an info line below the bar with 3 pieces of information:
- Left: Chap. X/Y (chapter number / total)
- Center: Page X / Total
- Right: XX% (progress percentage, in gold)
Expand mode (menu open)
When the menu is open (center tap), the bar expands and shows more controls:
1. Tension curve (heatmap)
A multicolored bar replaces the simple progress bar. It represents the emotional intensity curve of the entire book. Colors indicate the intensity level of each passage (blue = calm, gold = rising, orange = intense, red = climax). A vertical cursor shows your position. You can tap anywhere on the heatmap to jump to that passage.
2. Intensity slider (in immersion mode)
When Toys mode is active, a RangeSlider appears with the label “Immersion” and a vibration icon. It shows the min–max range of vibration (e.g. “20–80%”). You can adjust both cursors to set the minimum and maximum vibration intensity in real time.
3. Controls row
The main controls row contains, from left to right:
| Button | Icon | Action | Details |
|---|---|---|---|
| Previous chapter | ⏮ | Jump to the start of the previous chapter | Hidden during auto-scroll. |
| Play / Stop | ▶ / ⏹ | Start / stop auto-scroll | Round gold button. When scrolling is active, the button turns red with a Stop icon and grows slightly larger to signal that scrolling is active. |
| Next chapter | ⏭ | Jump to the start of the next chapter | Hidden during auto-scroll. |
| (space) | |||
| “Social” chip | 👥 | Join a social reading session | Only visible if the feature is enabled. See Social reading. |
| “Annot.” chip | ✏️ | Enable / disable annotation mode | When active (gold), you can select text to create highlights. Long press on the chip to open the Notes & bookmarks panel directly. |
| “Toys” chip | 📳 | Enable / disable vibrations | Promoted to the main row when Toys mode is active (gold). Otherwise, accessible via the secondary panel. |
| “Demo” chip | 📱 | Enable / disable Demo mode (phone vibrator) | Promoted to the main row when active. Otherwise, accessible via the secondary panel. Demo and Toys are mutually exclusive. |
| Expand button ▼ | ▼ | Open / close the secondary panel | Small round button. The arrow rotates 180° when the panel is open. If a mode is active (Toys, TTS, etc.), the button is tinted gold to signal there are options below. |
4. Secondary panel (expand)
Tap the ▼ button to unfold the secondary panel. It displays the inactive modes as chips:
- TTS (microphone icon): activates text-to-speech. Long press to open voice settings.
- Sound (headphones icon): activates soundscapes (if available).
- Toys (vibration icon): activates vibration immersion mode.
- Demo (phone icon): activates Demo mode with your phone’s vibrator.
Page information
Permanently visible at the bottom of the screen (even with menu closed), you see:
- Left: “Chap. X/Y” (current chapter / total number of chapters)
- Center: “Page X / Total” (calculated page / total number of pages)
- Right: “XX%” (progress percentage, displayed in gold)
Floating navigation capsule
When an interactive mode is active (TTS, Soundscape, Manual control, or Social reading), a floating rounded capsule appears at the bottom of the screen, independently of the menu. It only shows the currently active modes:
| Chip | Icon | Tap action | Long press action |
|---|---|---|---|
| TTS | 🔊 | Enable / disable text-to-speech | Open voice settings (speed, pitch, volume) |
| Sound | 🎧 | Enable / disable the soundscape | — |
| Manual | 🎮 | Open manual vibration control | — |
| Social | 👥 | Open the social reading session | — |
Each active chip is separated by a thin vertical line. The capsule disappears when you deactivate all modes.
Annotations and highlighting
Create a highlight:
- Enable annotation mode by tapping the “Annot.” chip in the bottom bar (the chip turns gold)
- Select text in the book by dragging your finger
- A context menu appears with the following options:
| Element | Details |
|---|---|
| 5 color dots | Gold (🟡), Pink (🔴), Mint (🟢), Sky blue (🔵), Lavender (🟣). Tap a color to apply the highlight. |
| 3 style buttons | Highlight (colored fill behind text), Underline (line under text), Wavy (wavy line under text, “squiggly” style). |
| “Note” button | Opens a text field to add a personal comment to this highlight. |
Edit an existing highlight:
Tap a highlight in the text to open the edit dialog:
| Element | Details |
|---|---|
| Text preview | The highlighted text is displayed in italic on a colored background (the current highlight color, muted). |
| 5 color dots | Same 5 colors as during creation. The current color has a white checkmark. Tap another color to change it. |
| 3 style buttons | Highlight / Underline / Wavy. The active style has a gold background. Tap another style to change it. |
| Note field | Free text field (3 lines max) to add or edit a personal comment. |
| “Delete” button | Bottom left, red text. Permanently deletes the highlight (confirmation is required). |
| “Cancel” button | Closes the dialog without saving changes. |
| “Save” button | Gold button at the bottom right. Saves changes (color, style, note). |
Notes & bookmarks panel
This panel unifies all your bookmarks and highlights in a single list. To open it:
- Tap the ✏️ Annotations icon in the top bar, or
- Long press the bookmark button, or
- Long press the “Annot.” chip in the bottom bar
The panel opens as a bottom sheet (slides up from the bottom) and displays:
| Element | Position | Details |
|---|---|---|
| “Notes & bookmarks (X)” title | Header | Total number of items in parentheses. |
| Sort button | Header, right | Toggles between sort by position (sort icon) and sort by date (clock icon). Position sort displays items in book order; date sort shows the most recent first. |
| Export button | Header, right | Gold share icon. Exports all your annotations as a Markdown (.md) file that you can share or save. Only visible if there are items. |
| Type filters | Below header | 3 chips: All (X), Bookmarks (X), Annotations (X). Each chip shows the item count. The active filter is highlighted in gold. |
| Color filters | Below type filters | 6 round dots: “All” (∞ icon) + the 5 colors (gold, pink, mint, blue, lavender). Tap a color to show only items of that color. Tap again to deactivate the filter. |
| Item list | Body | Each item displays: a color bar on the left (or a bookmark icon), a text preview (80 characters max), the associated note (if any), and the age (“just now”, “3h ago”, etc.). Tap to navigate to that item in the text. Trash button on the right to delete. |
Text settings
Tap the Aa button at the top right to open the customization panel. It has 4 tabs:
“Font” tab
Customize the font and text size:
- Font carousel: scroll horizontally to choose from Serif, Sans, Mono, Cursive, Fantasy. Each option shows an “Aa” preview in that font style. The active font is outlined in gold.
- Text size: a horizontal slider with a small “A” on the left and a large “A” on the right. Adjusts the size from 12 to 28 pixels.
“Layout” tab
Controls the appearance and spacing of text:
| Setting | Type | Details |
|---|---|---|
| Page color | 6 round dots | Choose the background color from 6 themes: Dark (black), Sepia (warm beige), Light (white), Blue (night blue), Cream (warm white), AMOLED (pure black). The active dot has a thick gold border. |
| Continuous scroll | Toggle on/off | Enables continuous scrolling (no pagination). |
| Left-handed mode | Toggle on/off | Moves auto-scroll speed controls and certain buttons to the left side of the screen, for left-thumb use. |
| Line spacing | Slider (1.2 to 2.2) | Adjusts the spacing between lines. The current value is displayed to the right of the slider (e.g. 1.6). |
| — Accessibility separator — | ||
| Bold text | Toggle on/off | ♿ icon. Makes all text bold for better readability. |
| Bionic Reading | Toggle on/off | ✨ icon. Bolds the first half of each word to guide the eye and speed up reading. For example, the word “reading” displays as “reading”. |
| Dyslexia Mode | Button on/off | Aa icon. Outlined button (highlighted in gold when active, with a ✓ checkmark). Activates the OpenDyslexic font, increases letter and word spacing, and adds a reading guide to make reading easier for people with dyslexia. |
“Themes” tab
Controls colors, brightness, and automatic day/night mode:
| Setting | Type | Details |
|---|---|---|
| Brightness | Slider | Low sun icon on left, high sun icon on right. Adjusts brightness from 20% to 100%. Disabled if automatic brightness is active. |
| Auto brightness | Toggle on/off | Auto sun icon. Lets the system manage brightness. |
| Auto Day/Night | Toggle on/off | Star icon. Automatically switches between a day and night theme based on the time. When enabled, two sub-rows of dots appear: |
| ☀ Day: Light, Sepia, Cream (choose your day theme) 🌙 Night: Dark, Blue (choose your night theme) | ||
| 6 theme presets | Grid of 6 tiles | Each preset shows an “Aa” preview with the corresponding background and text colors. The active tile has a gold border. The 6 themes: Dark (black background, light text), Sepia (beige background, brown text), Light (white background, black text), Blue (night blue background, light blue text), Cream (ivory background, black text), AMOLED (pure black #000 background, light gray text — ideal for OLED screens, saves battery). |
“More” tab
Technical options and Bluetooth connection:
| Element | Details |
|---|---|
| Bluetooth status | Rounded card showing the connection status. If connected: green Bluetooth icon + device name (or “X toys” if multi-device). If disconnected: gray icon + gold “Connect” button that opens the connection screen directly. |
| Auto-connect last device | Info line with Bluetooth search icon and gold checkmark. Indicates that the app will automatically try to reconnect to your last device. |
| Clear analysis cache | Button with trash icon. Deletes analysis data (heatmap, keywords) for your books. Useful if a book was analyzed incorrectly. Books will be re-analyzed the next time they are opened. |
Auto-scroll
Auto-scroll mode scrolls the text on its own — perfect for hands-free reading.
Controls
Immersion Mode
The heart of Ember Read: vibrations sync with the intense passages of the text you’re reading.
Compatible devices
Ember Read supports 6 brands of connected toys, plus a demo mode:
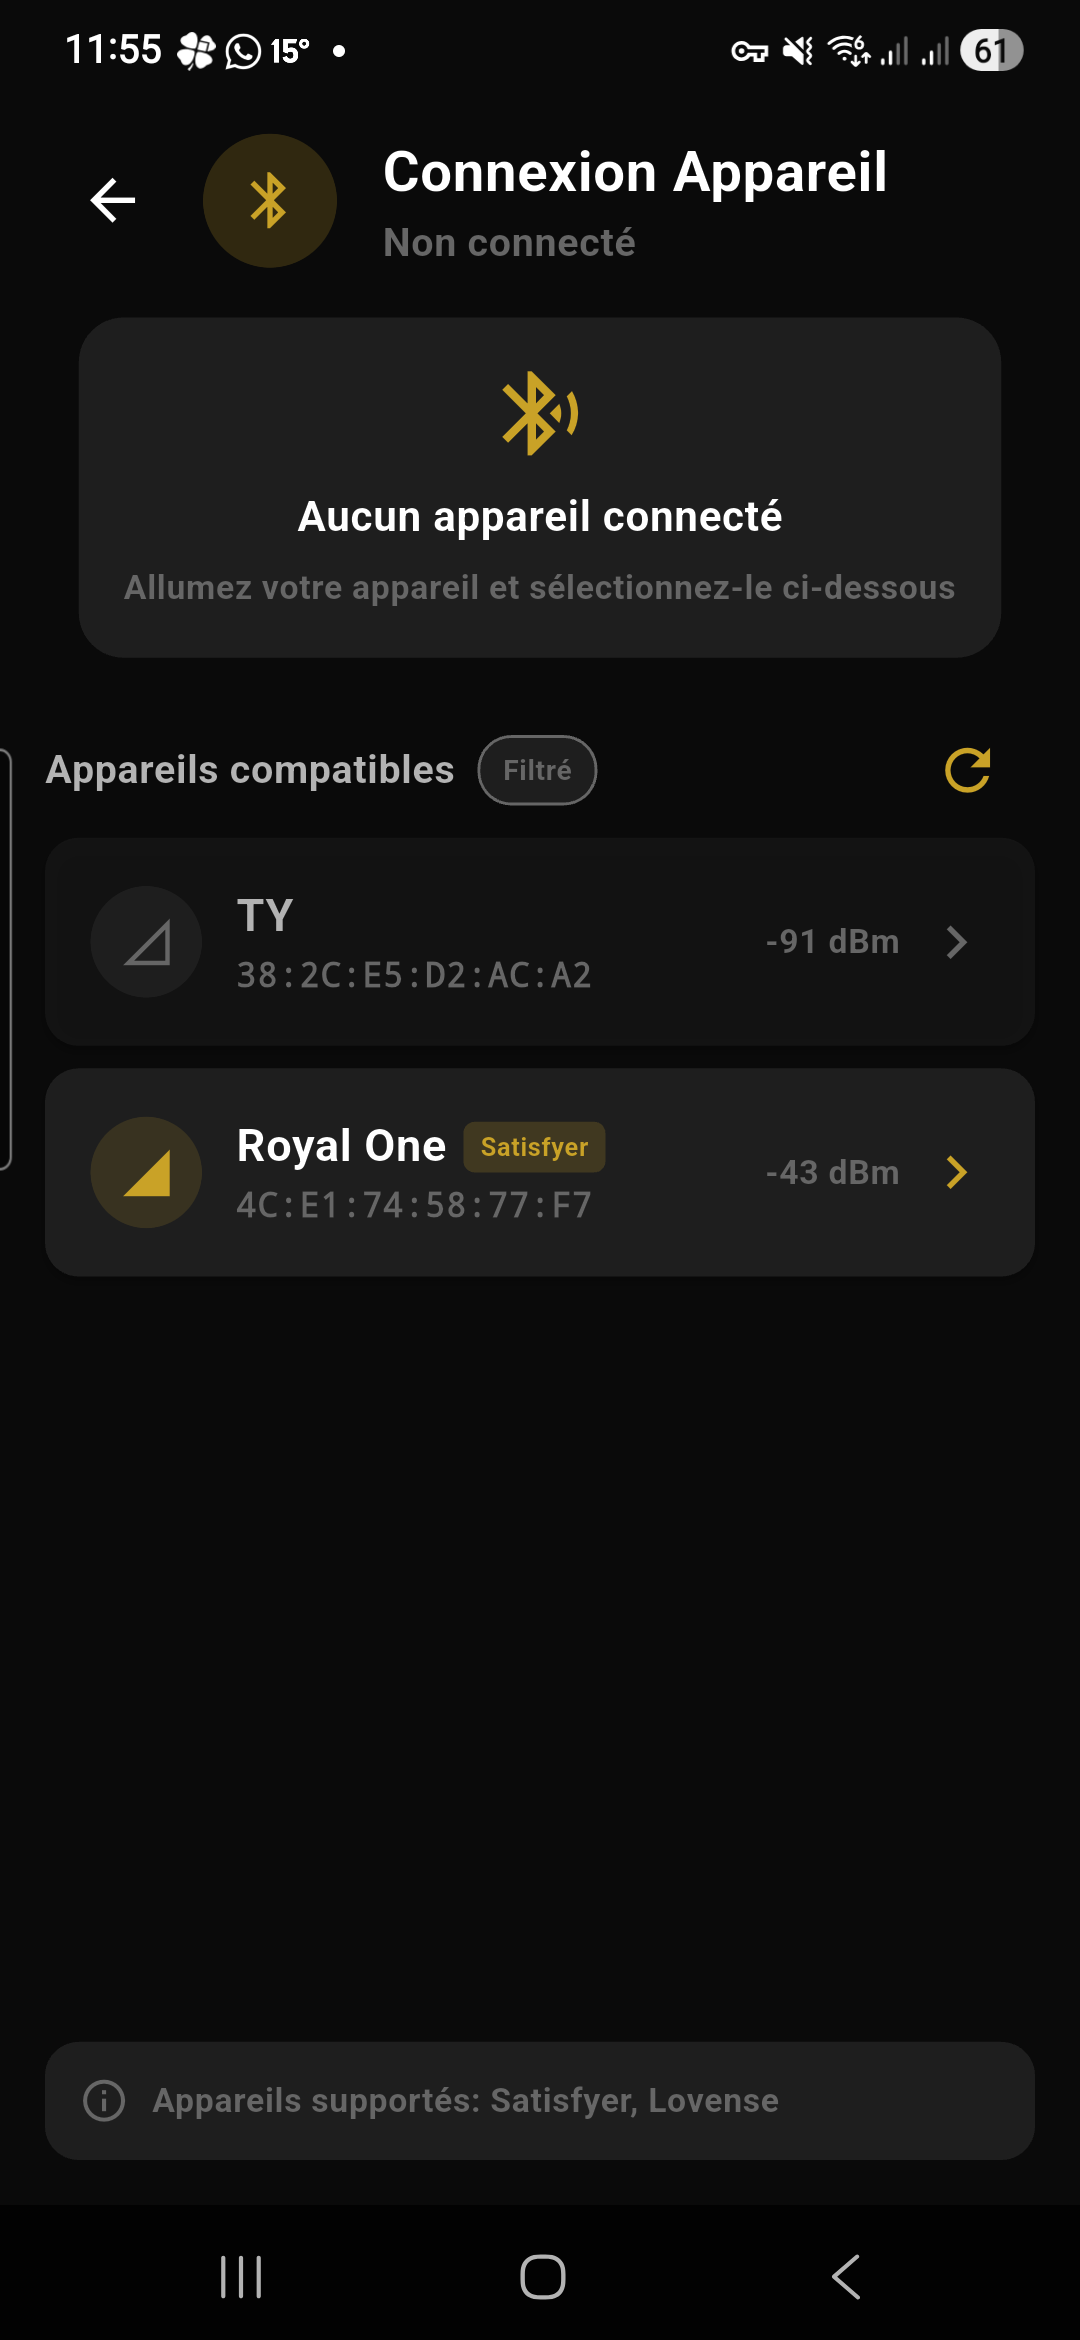
Connecting a device
Three ways to connect your toy:
Method 1 — Quick connect (recommended)
- Turn on your device (most turn on with a long press on the button)
- Go to Settings > Bluetooth > Connect
- The app automatically scans for nearby devices
- Your device appears in the list with its name and brand
- Tap on it to connect
- The icon turns green ✅ when the connection is established
- A “Test” button appears — tap it to verify the device vibrates
Method 2 — Quick reconnect
Method 3 — Connection wizard
If your device isn’t detected automatically (some models require a specific pairing mode), use the 4-step assistant:
- Step 1 — Choose your brand: a grid of 6 logos is displayed (Satisfyer, Lovense, Svakom, Magic Motion, We-Vibe, Lelo). Tap on your brand’s logo.
- Step 2 — Select your model: a list of all compatible models from the brand is displayed. Each model shows its capabilities via icons: 📳 vibration, 🌬️ suction, 🔥 heat, 🔄 rotation. Tap on your model.
- Step 3 — Pairing guide: brand-specific instructions are displayed (e.g. “Press and hold the + button for 3 seconds until the light flashes”). Instructions vary depending on the brand and model.
- Step 4 — Targeted scan: the app launches a targeted Bluetooth scan using only your brand’s protocols (faster and more reliable than a generic scan). Your device appears as soon as it’s detected.
Multi-device
The Bluetooth management screen shows the list of all connected devices with their name, brand and battery level (if available). You can disconnect a device individually by tapping on it.
Activating the mode
Tap the Toys chip in the reader’s bottom bar:
- ON (gold): vibrations follow the text intensity
- OFF: vibrations disabled
The heatmap
At the bottom of the reader, the progress bar is colored according to the emotional intensity of each passage:
| Color | Intensity | What it means |
|---|---|---|
| Blue-gray | Soft | Calm passages, dialogue, descriptions |
| Gold | Building | Tension is rising, preludes |
| Orange | Intense | Passionate scenes |
| Red | Climax | Peak intensity moments |
Intensity range
Battery indicator
When immersion mode is active, an indicator appears in the top right corner:
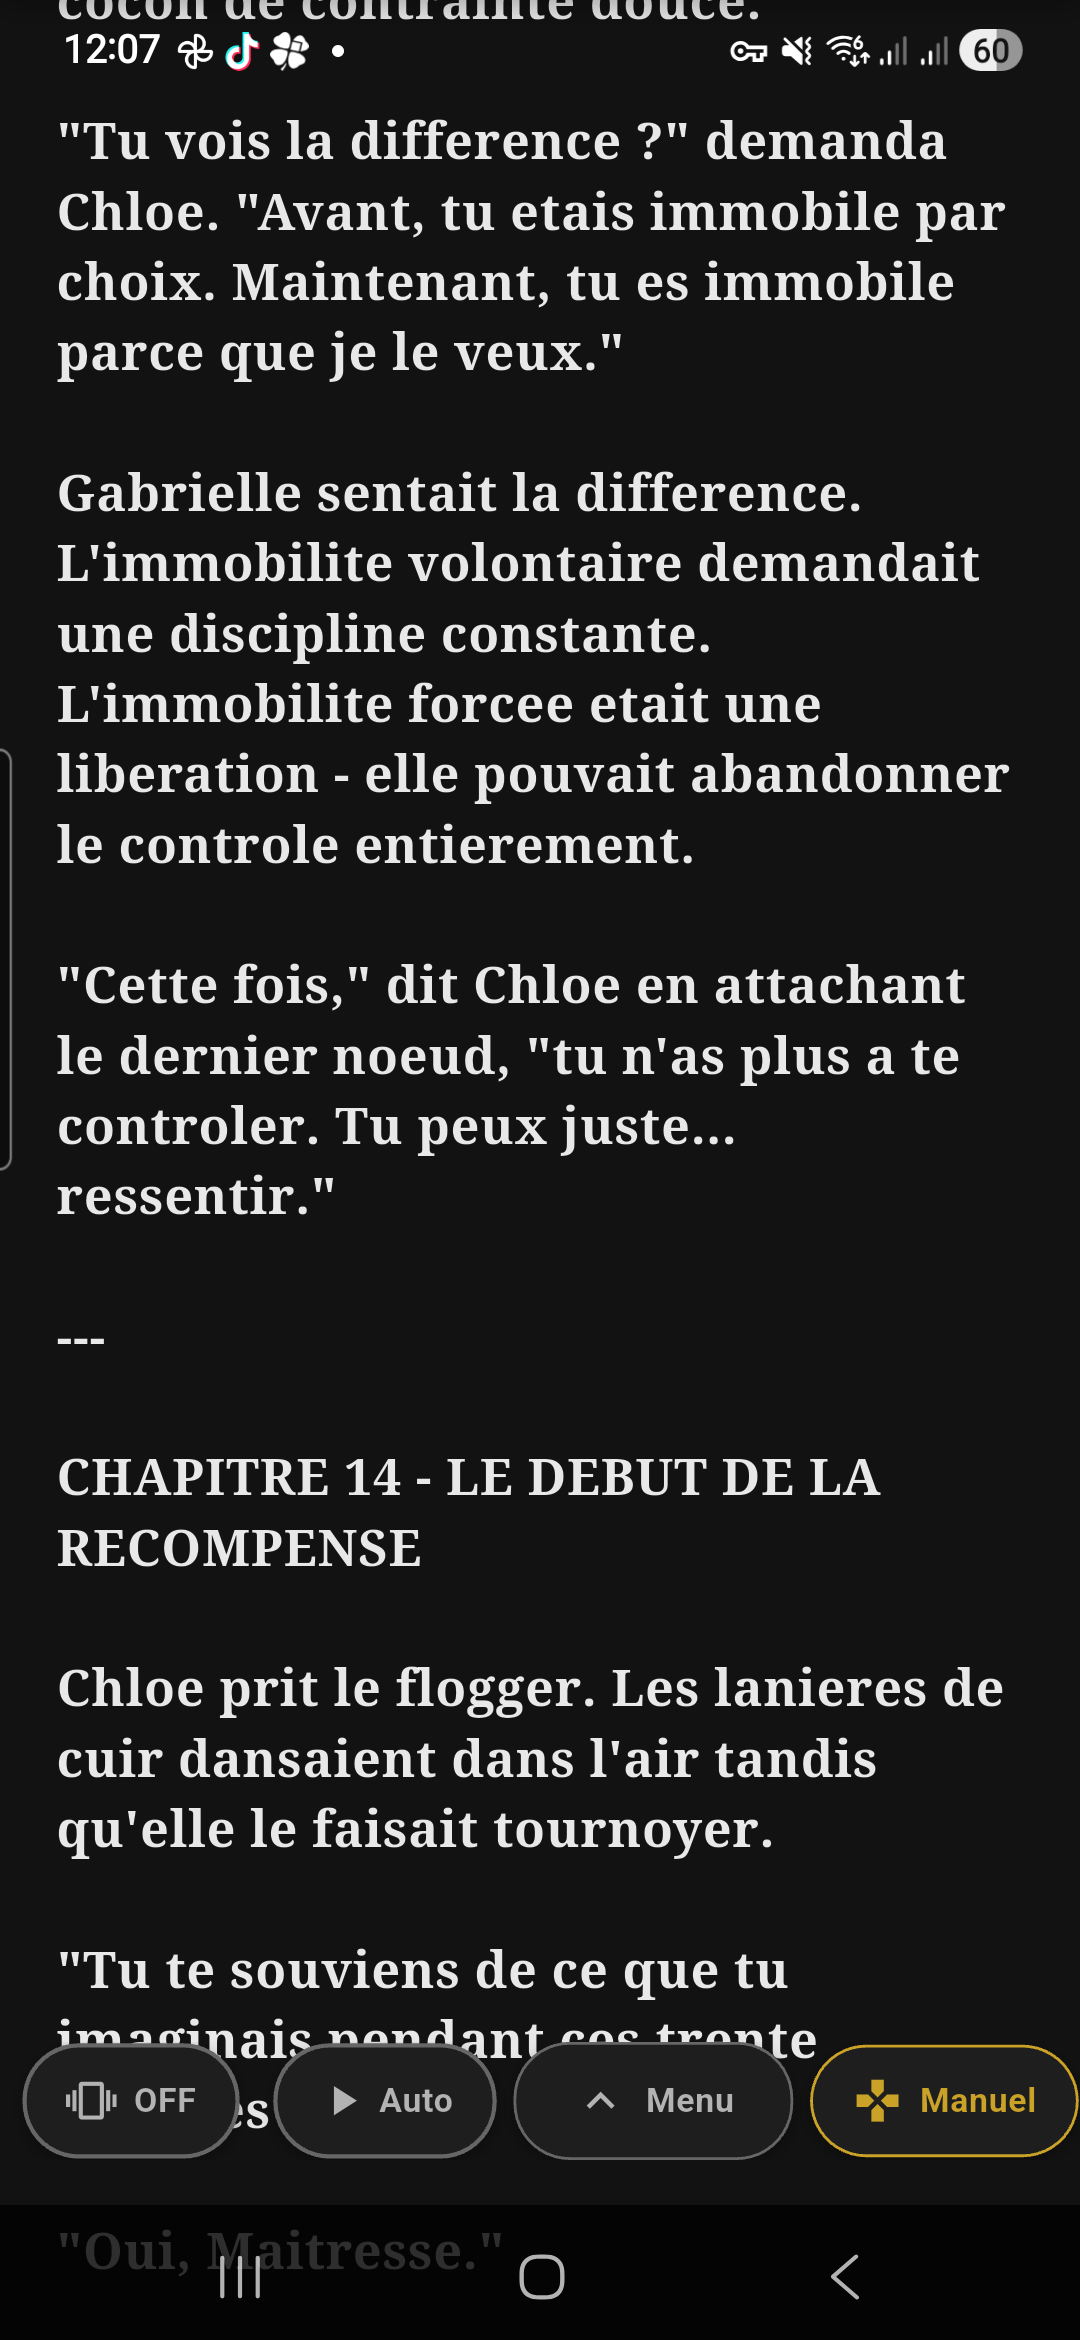
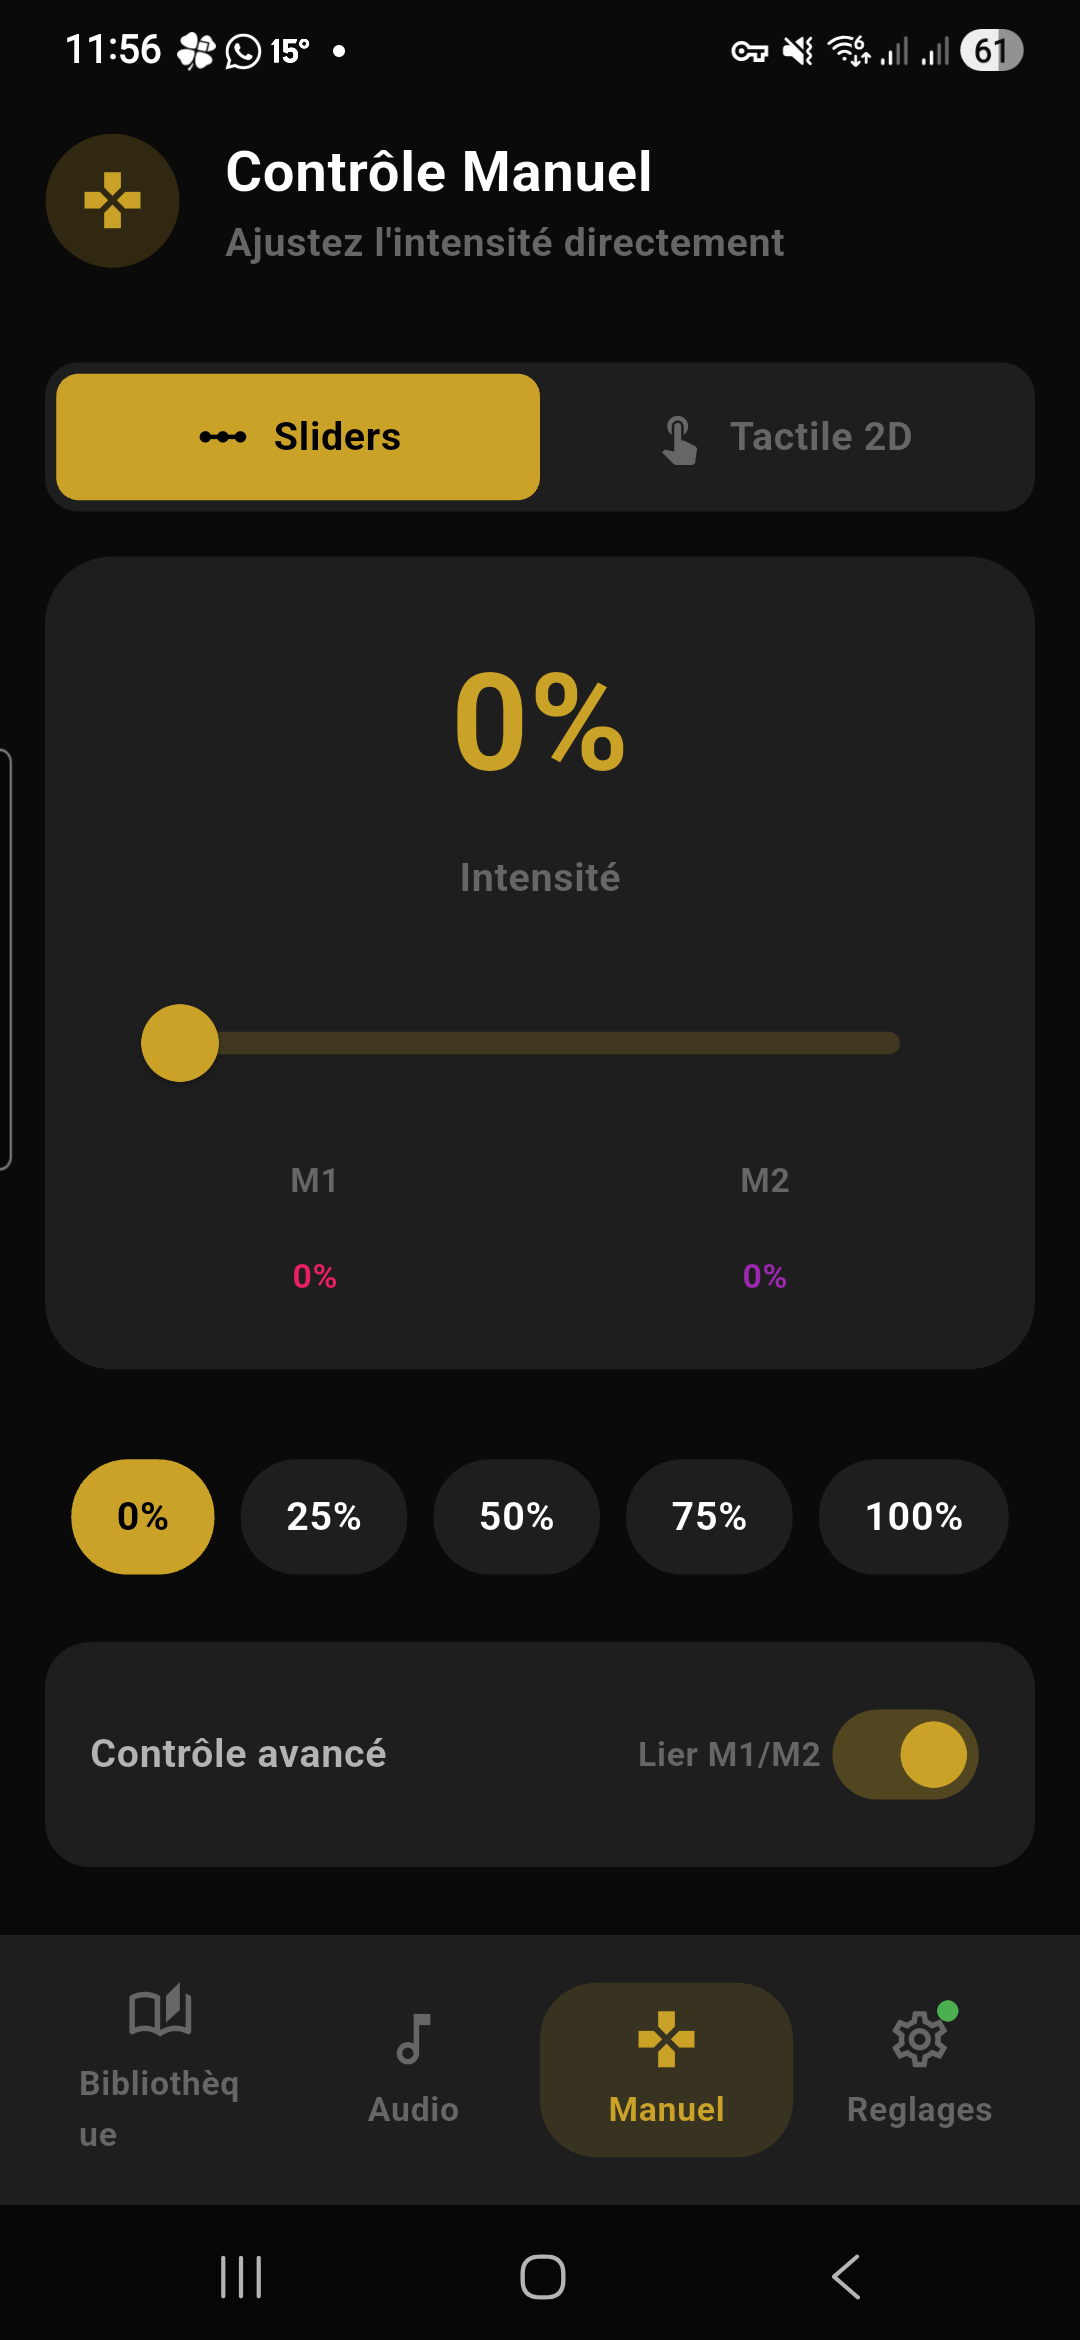
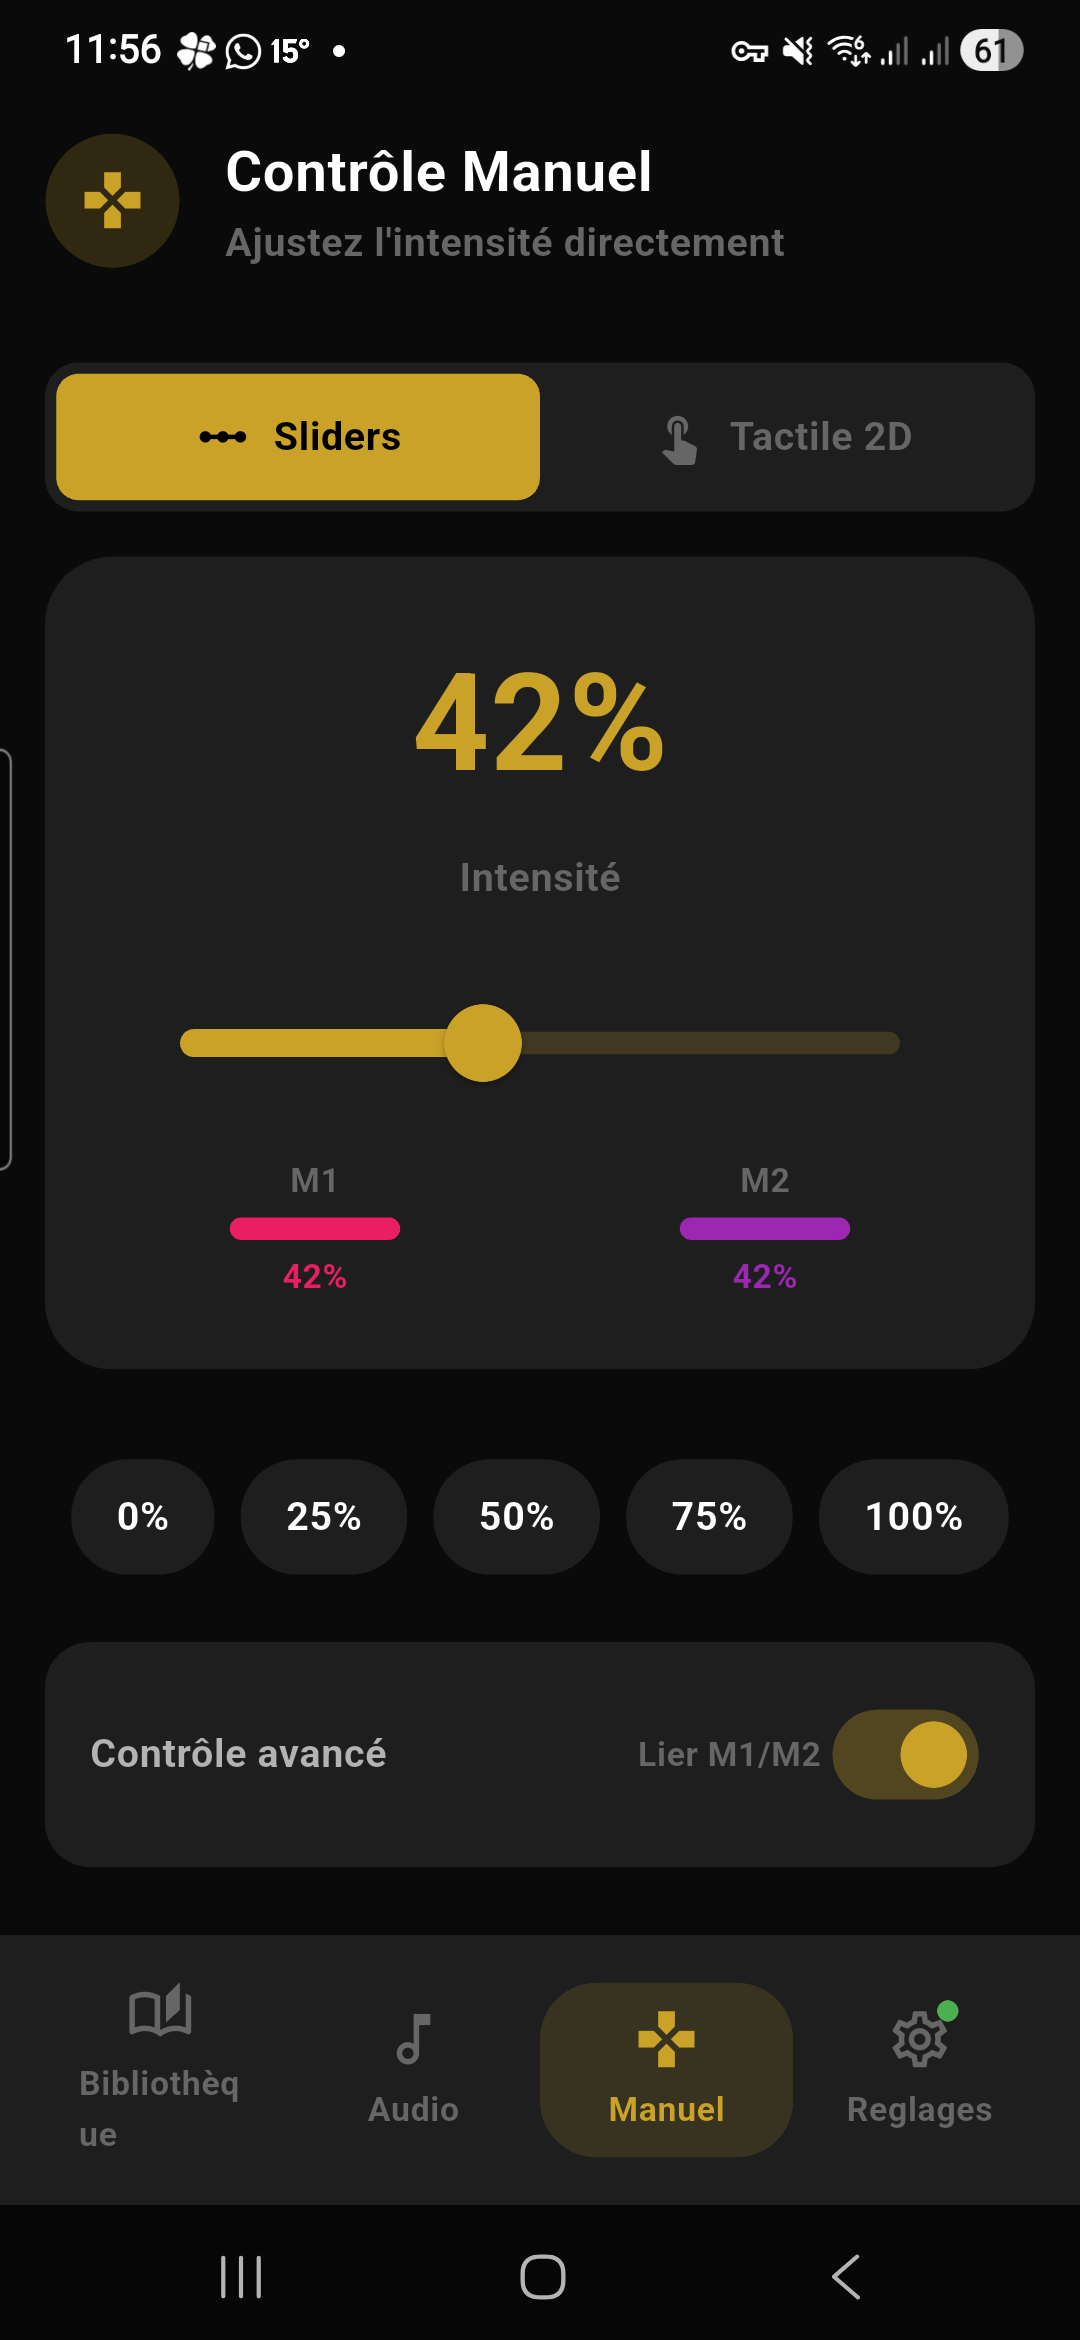
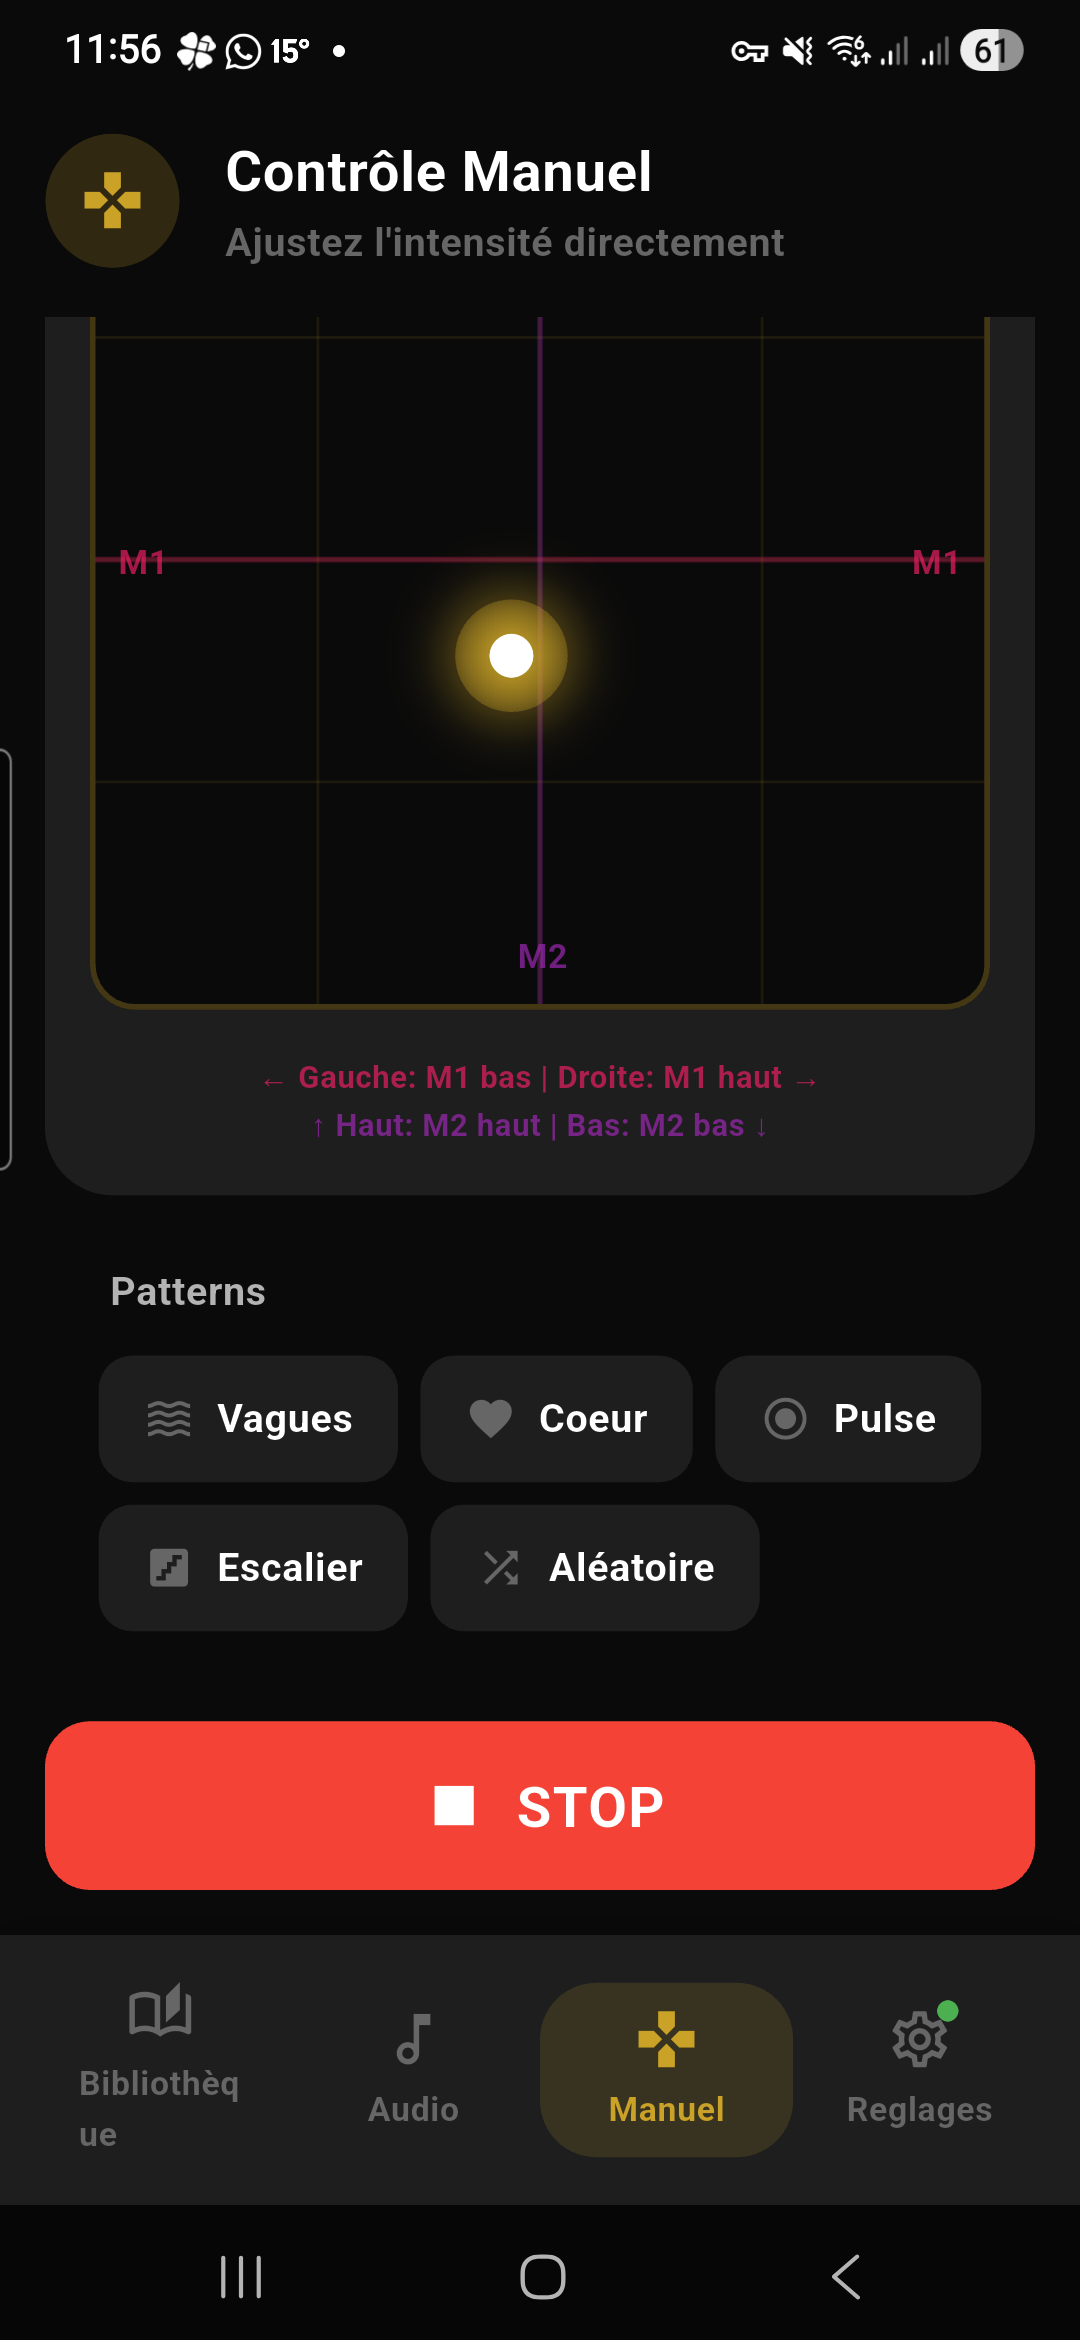
Manual mode
Tap Manual (tab in the navigation) for direct control:
- Sliders: intensity per motor (motor 1, motor 2)
- Quick buttons: 0%, 25%, 50%, 75%, 100%
- Patterns: Wave, Heartbeat, Pulse, Stairs, Random...
- 2D touch zone: finger control (full screen available)
- Special controls: suction, heat, rotation (depending on the connected model)
Text-to-Speech (TTS)
Activating text-to-speech
- In the reader, open the menu (tap the center of the screen)
- Tap the ▼ expand button at the bottom right of the control bar
- In the secondary panel that appears, tap the “TTS” chip (microphone icon)
- A floating control panel appears in the center of the screen (rounded black capsule)
- Playback starts as soon as you tap Play
Floating control panel
The TTS panel is a rounded black floating bar in the center of the screen containing, from left to right:
| Button | Icon | Action | Details |
|---|---|---|---|
| Play / Pause | ▶ / ⏸ | Starts or pauses voice playback | When paused, the text stays highlighted on the last spoken word. Tap again to resume. |
| Stop | ⏹ | Completely stops playback | Word-by-word highlighting disappears. Grayed out when TTS is not active. |
| Speed | 1.0x | Opens TTS settings | Displays the current speed in a rounded gray badge. Tap to open the full settings panel (see below). |
| Close | ✕ | Closes the TTS panel | Deactivates text-to-speech and hides the floating panel. |
Word-by-word highlighting
During voice playback, each word is individually highlighted at the exact moment it’s spoken. The text scrolls automatically so the current word always stays visible on screen. You don’t need to touch anything: TTS controls the scroll.
Voice settings
Tap the speed badge (e.g. “1.0x”) to open the settings panel. A bottom sheet appears with:
| Setting | Type | Range | Details |
|---|---|---|---|
| Enable TTS | Toggle on/off | — | Globally enables or disables the TTS feature. Shows “Text audio playback” when active, or “Not available with your plan” if the feature is disabled for your account. |
| Voice selection | Horizontal carousel | — | Displays all voices available on your phone. Each voice is shown as a chip with its name. High-quality (Enhanced) voices have a star icon ✨. The active voice is highlighted in pink. Tap a voice to select it — playback resumes with the new voice. |
| Speed | Slider | 0.2x to 2.0x | Controls voice playback speed. The value is displayed to the right of the slider (e.g. “1.4x”). 1.0x = normal speed. |
| Pitch | Slider | 0.5 to 2.0 | Controls the pitch (low/high) of the voice. 1.0 = normal pitch. |
| Volume | Slider | 0 to 100% | Controls text-to-speech volume, independently from the system volume. |
Interactions with other features
- Auto-scroll: when TTS is active, it controls the automatic scrolling. You don’t need to enable auto-scroll separately.
- Ambient sounds: if an ambient sound is playing and you activate TTS, the ambient sound pauses automatically to avoid interfering with the voice. It resumes when you stop TTS.
- Vibrations: TTS works simultaneously with immersion mode (vibrations). You can have the text read aloud while feeling the vibrations.
✅ Wired headphones
✅ Bluetooth earbuds (AirPods, Galaxy Buds, etc.)
✅ Car audio (Bluetooth car)
❌ Bluetooth speakers (HomePod, JBL, Sonos, etc.) — blocked
❌ Chromecast / AirPlay — blocked
❌ Phone speaker — blocked
If you try to use a blocked device, an error message is displayed and playback won’t start.
Audio Mode
Makes your device vibrate to the rhythm of the ambient music.
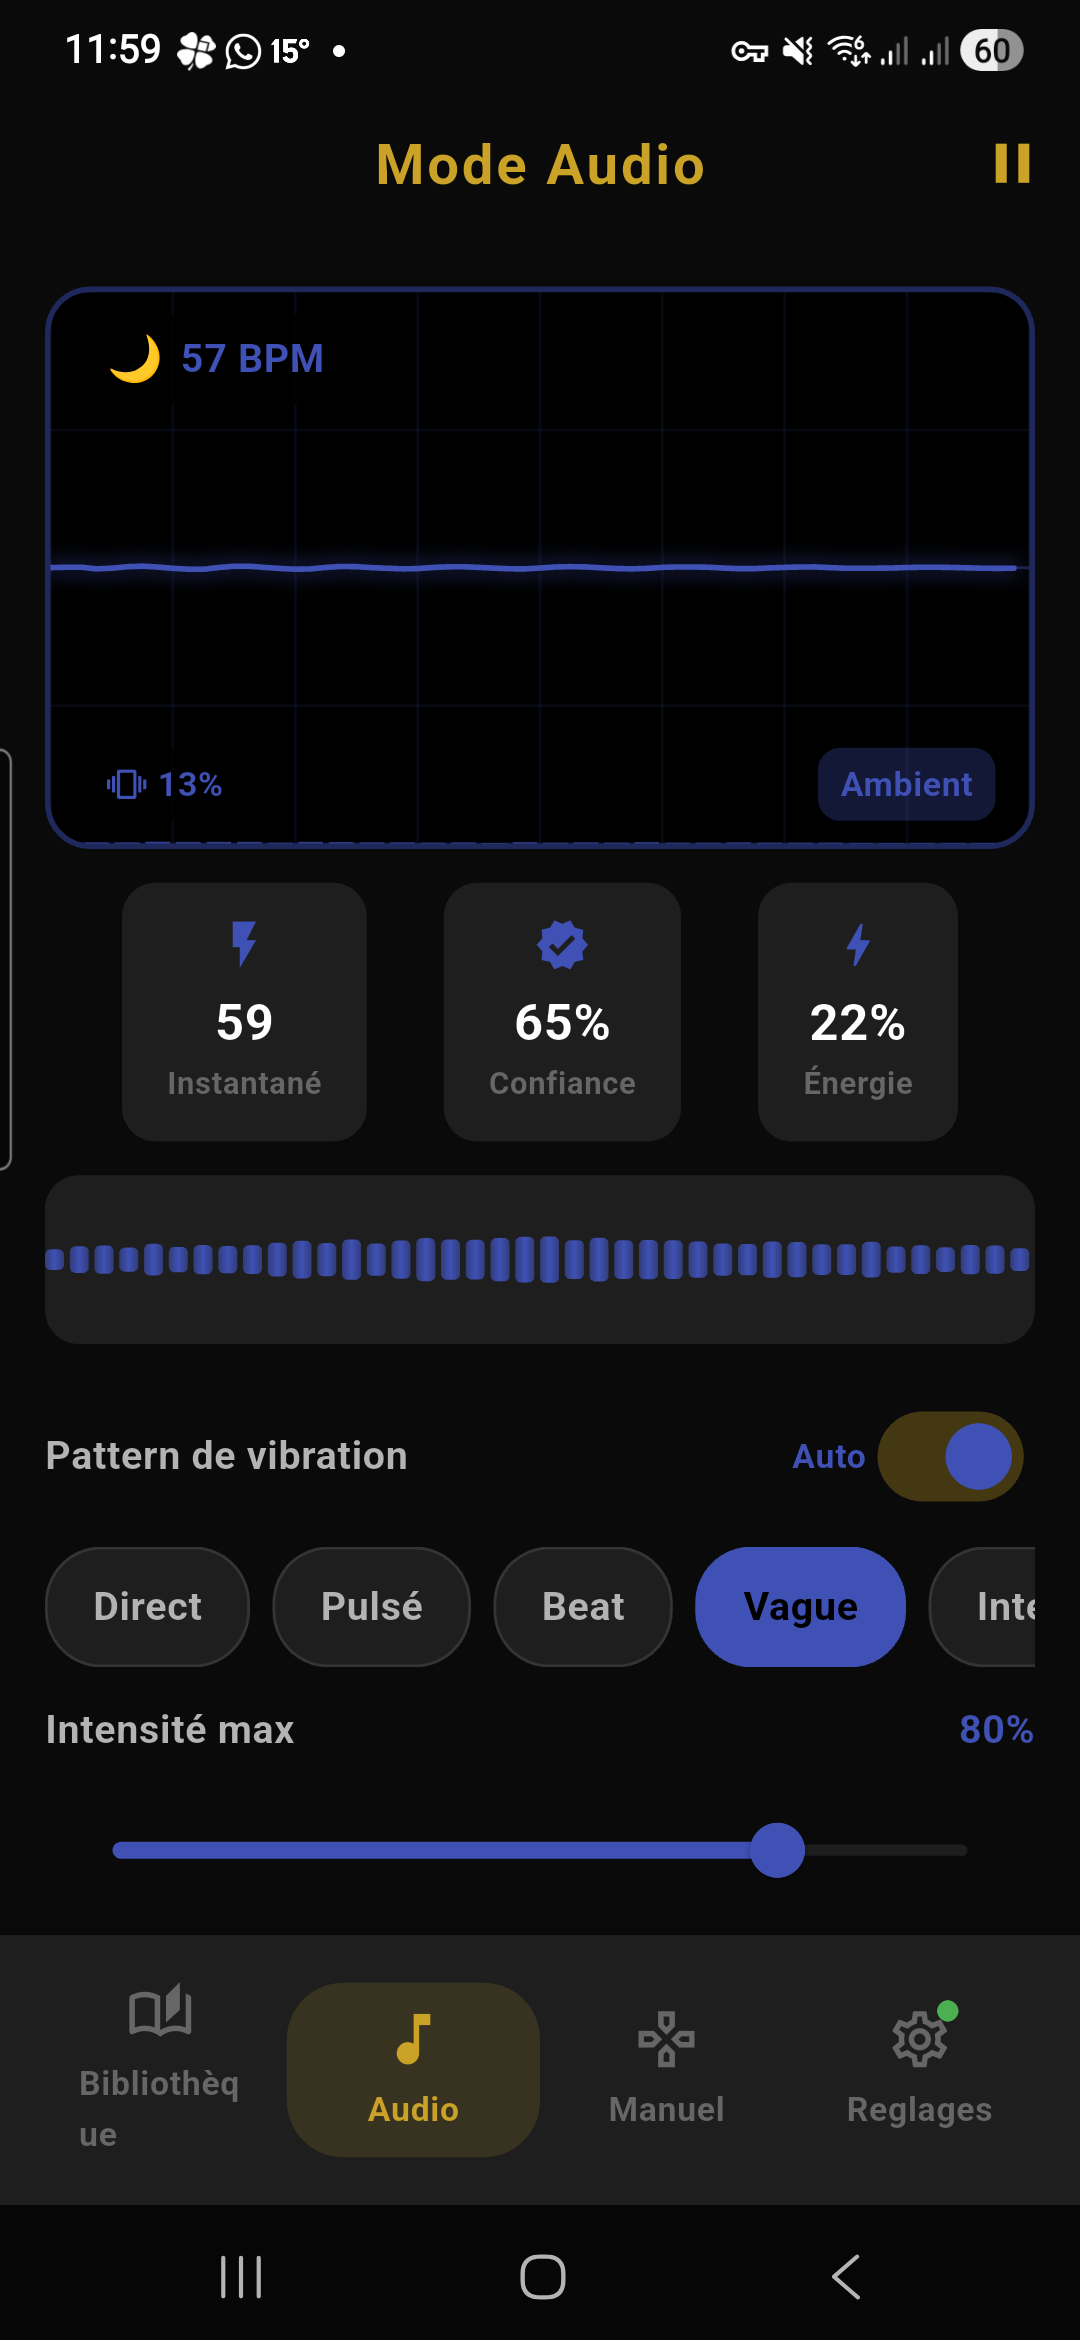
The modes
- Spotify Mode: full analysis (waveform, BPM, colors)
- Music bars: simplified visualization
- BPM: manual simulation with slider
- Motion: gyroscope / accelerometer
Vibration patterns
| Pattern | Description |
|---|---|
| Smooth | Follows the music gently |
| Pulse | Reacts to energy and beats |
| Beat | Only vibrates on the beats |
| Wave | Steady undulation |
| Intense | Strong, modulated by energy |
| Staccato | Ultra responsive |
Statistics
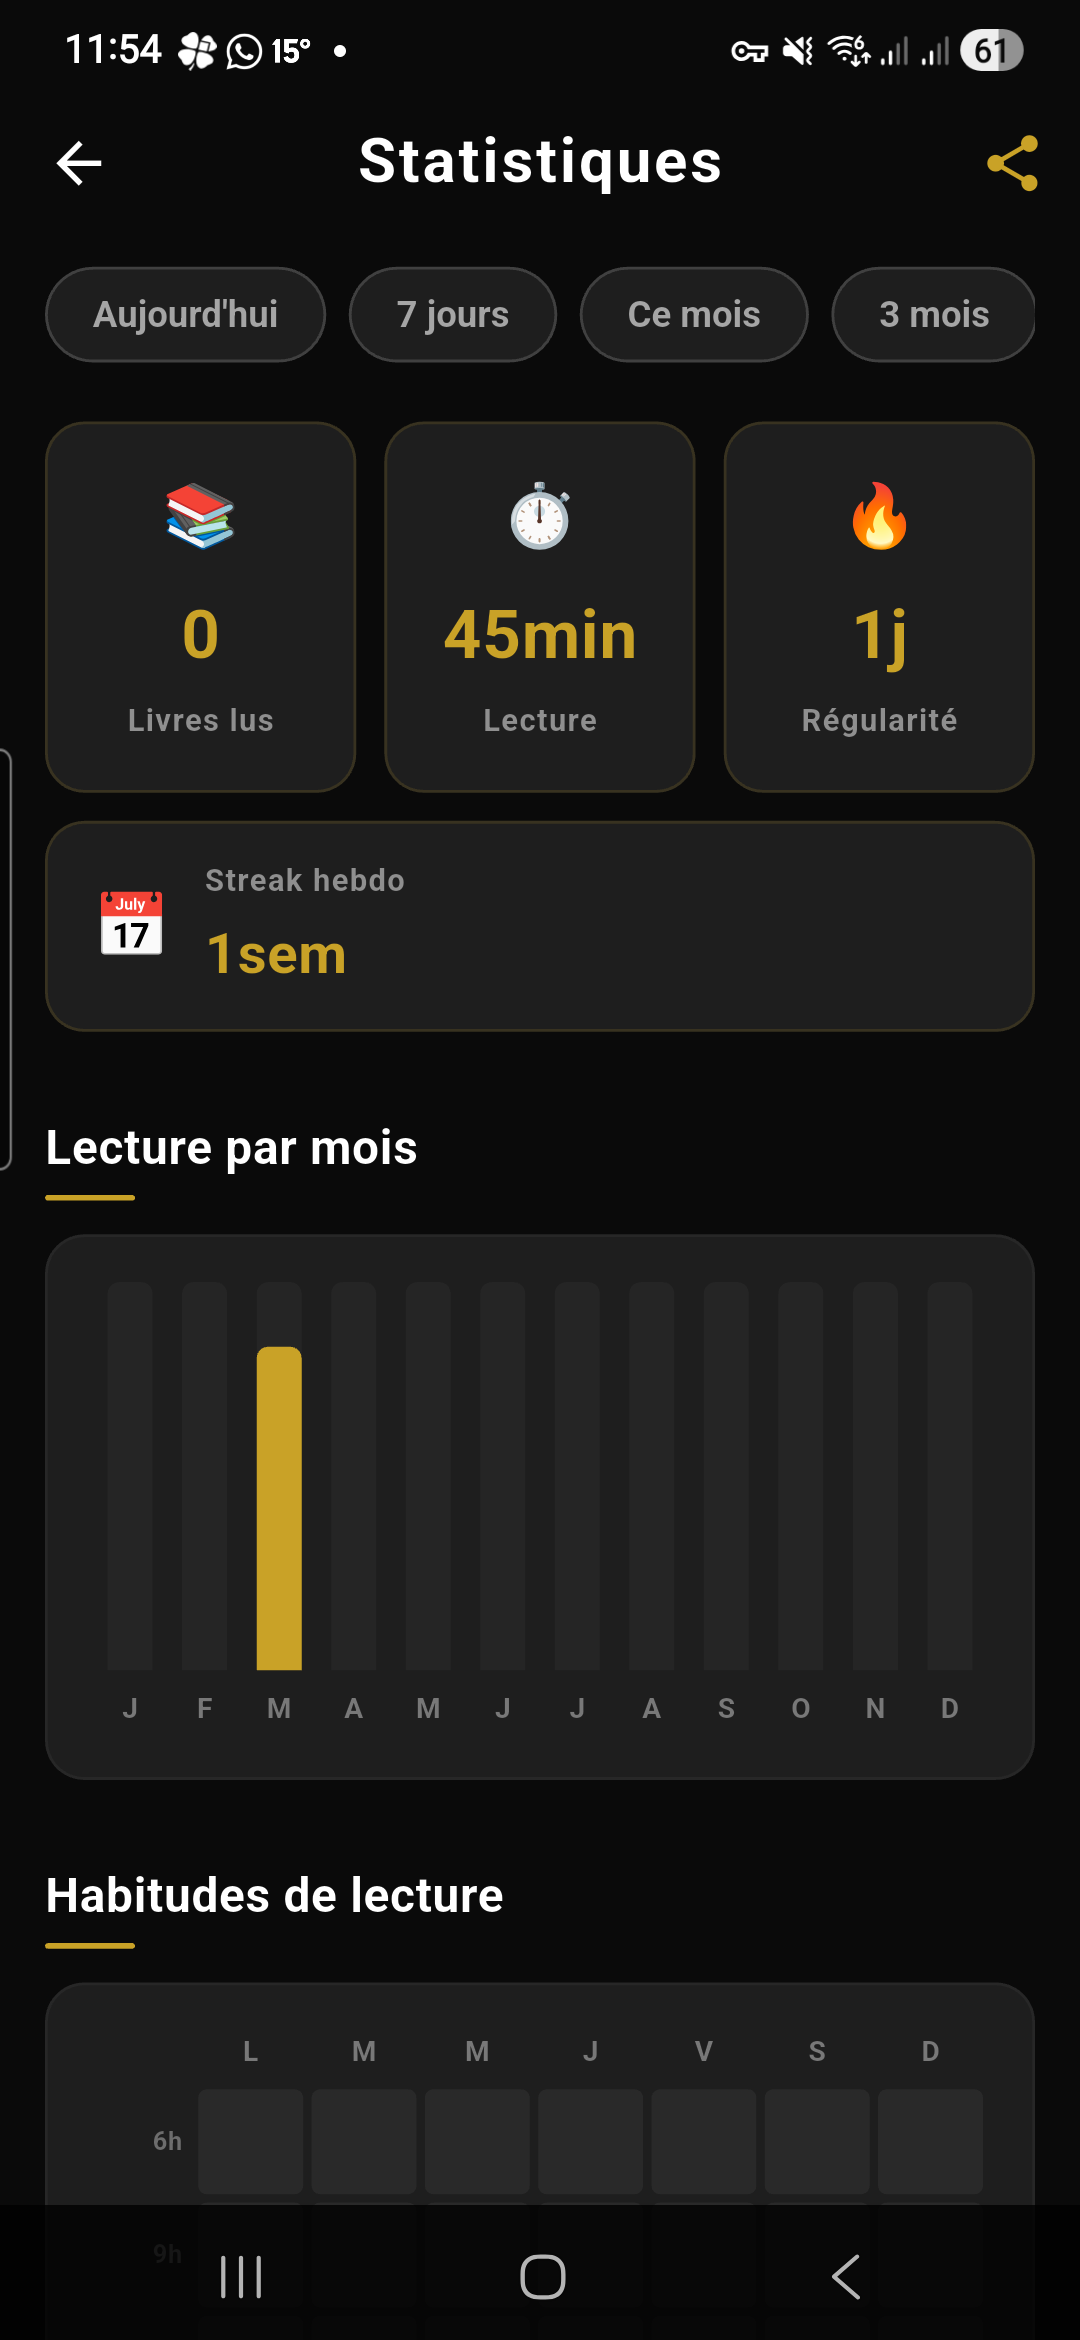
Header
At the top of the screen, the title “Statistics” is displayed in large text. To the right of the title, a 📤 Share button (gold, visible only for premium users) opens the shareable cards creation screen.
Weekly and monthly summaries
Two summary cards are displayed at the top if you’ve read recently:
- 📊 Weekly summary: recap of your week (reading time, active days, books finished)
- 📅 Monthly summary: recap of the current month (same info, at the monthly scale)
These summaries disappear if you haven’t read during the relevant period.
Period selector
| Period | What it covers |
|---|---|
| Today | Today’s reading sessions |
| 7 days | The last 7 days |
| This month | The current month |
| 3 months | The last 3 months |
| This year | The current year |
| All time | Since your account was created (default value) |
Streak card
A dedicated card displays your consecutive reading day streak:
- Current streak: number of consecutive days you’ve read (large and in gold)
- Record: your all-time best streak
- Days of the week: 7 dots (Mon–Sun) show which days of the current week you’ve read (filled in gold) or not (empty). A quick visual overview of your consistency.
Mini-stats
Six small cards display your key KPIs for the selected period:
- Books read: number of books finished
- Total time: hours and minutes of reading
- Sessions: number of reading sessions
- Active days: number of days you read
- Best day: your record for minutes read in a single day
- Favorite time: the time of day you read most (morning, afternoon, evening, night)
Monthly chart
A bar chart displays your reading minutes per month for the current year. Each bar represents a month (Jan–Dec). The current month is highlighted in gold.
Habits heatmap
A colored grid (7 days × 24 hours) shows at what times of the week you read the most. The darker cells indicate your preferred reading time slots.
Top authors
Spice level distribution 🌶️
Badges
Badges reward your reading achievements. Badges not yet earned are displayed in gray with the condition to fulfill.
| Badge | Name | Condition |
|---|---|---|
| 📚 | Bookworm | 10 or more books read |
| 🔥 | On Fire | 7-day consecutive streak or more |
| 😈 | Naughty | 20 books read at maximum intensity level (5 spice) |
| 🏆 | Champion | 100 books read in total |
| 💧 | Glutton | 5 books read in a single week |
| 🎯 | Consistent | 50 or more active reading days |
| ⏰ | Night Owl | Most of your reading happens after 9 PM |
| 🌅 | Early Bird | Most of your reading happens before 9 AM |
Reader profile
Your profile is displayed in a card with:
- A representative icon (emoji)
- A label: Romantic, Adventurous, Passionate, Explorer, etc.
- Your average heat (average intensity of your reading, out of 5)
- 5 vertical bars showing the breakdown of each level (🌸 to 💥) with the percentage
Free users see their profile name but not the details — a “Go Premium” button invites them to subscribe.
Ember Wrapped
A gold banner appears in the dashboard with the ✨ icon and the title “Ember Wrapped XXXX”. Tap it to open the retrospective:
- Page 1 — Your year: number of books finished, total reading time, active days. Confetti animation on arrival.
- Page 2 — Your habits: best streak, favorite reading time (morning/evening/night), number of sessions.
- Page 3 — Your favorite author: the author you read the most, with the number of books and time spent.
- Page 4 — Your profile: your intensity distribution (🌶️ thermometer) with colored bars from gentlest to hottest.
- Page 5 — Share: a visual summary in 9:16 format (story format) that you can share as a story on Instagram, TikTok or any social network.
Swipe left/right to navigate between pages. Free users see a preview (number of books) but must go premium to see the full retrospective.
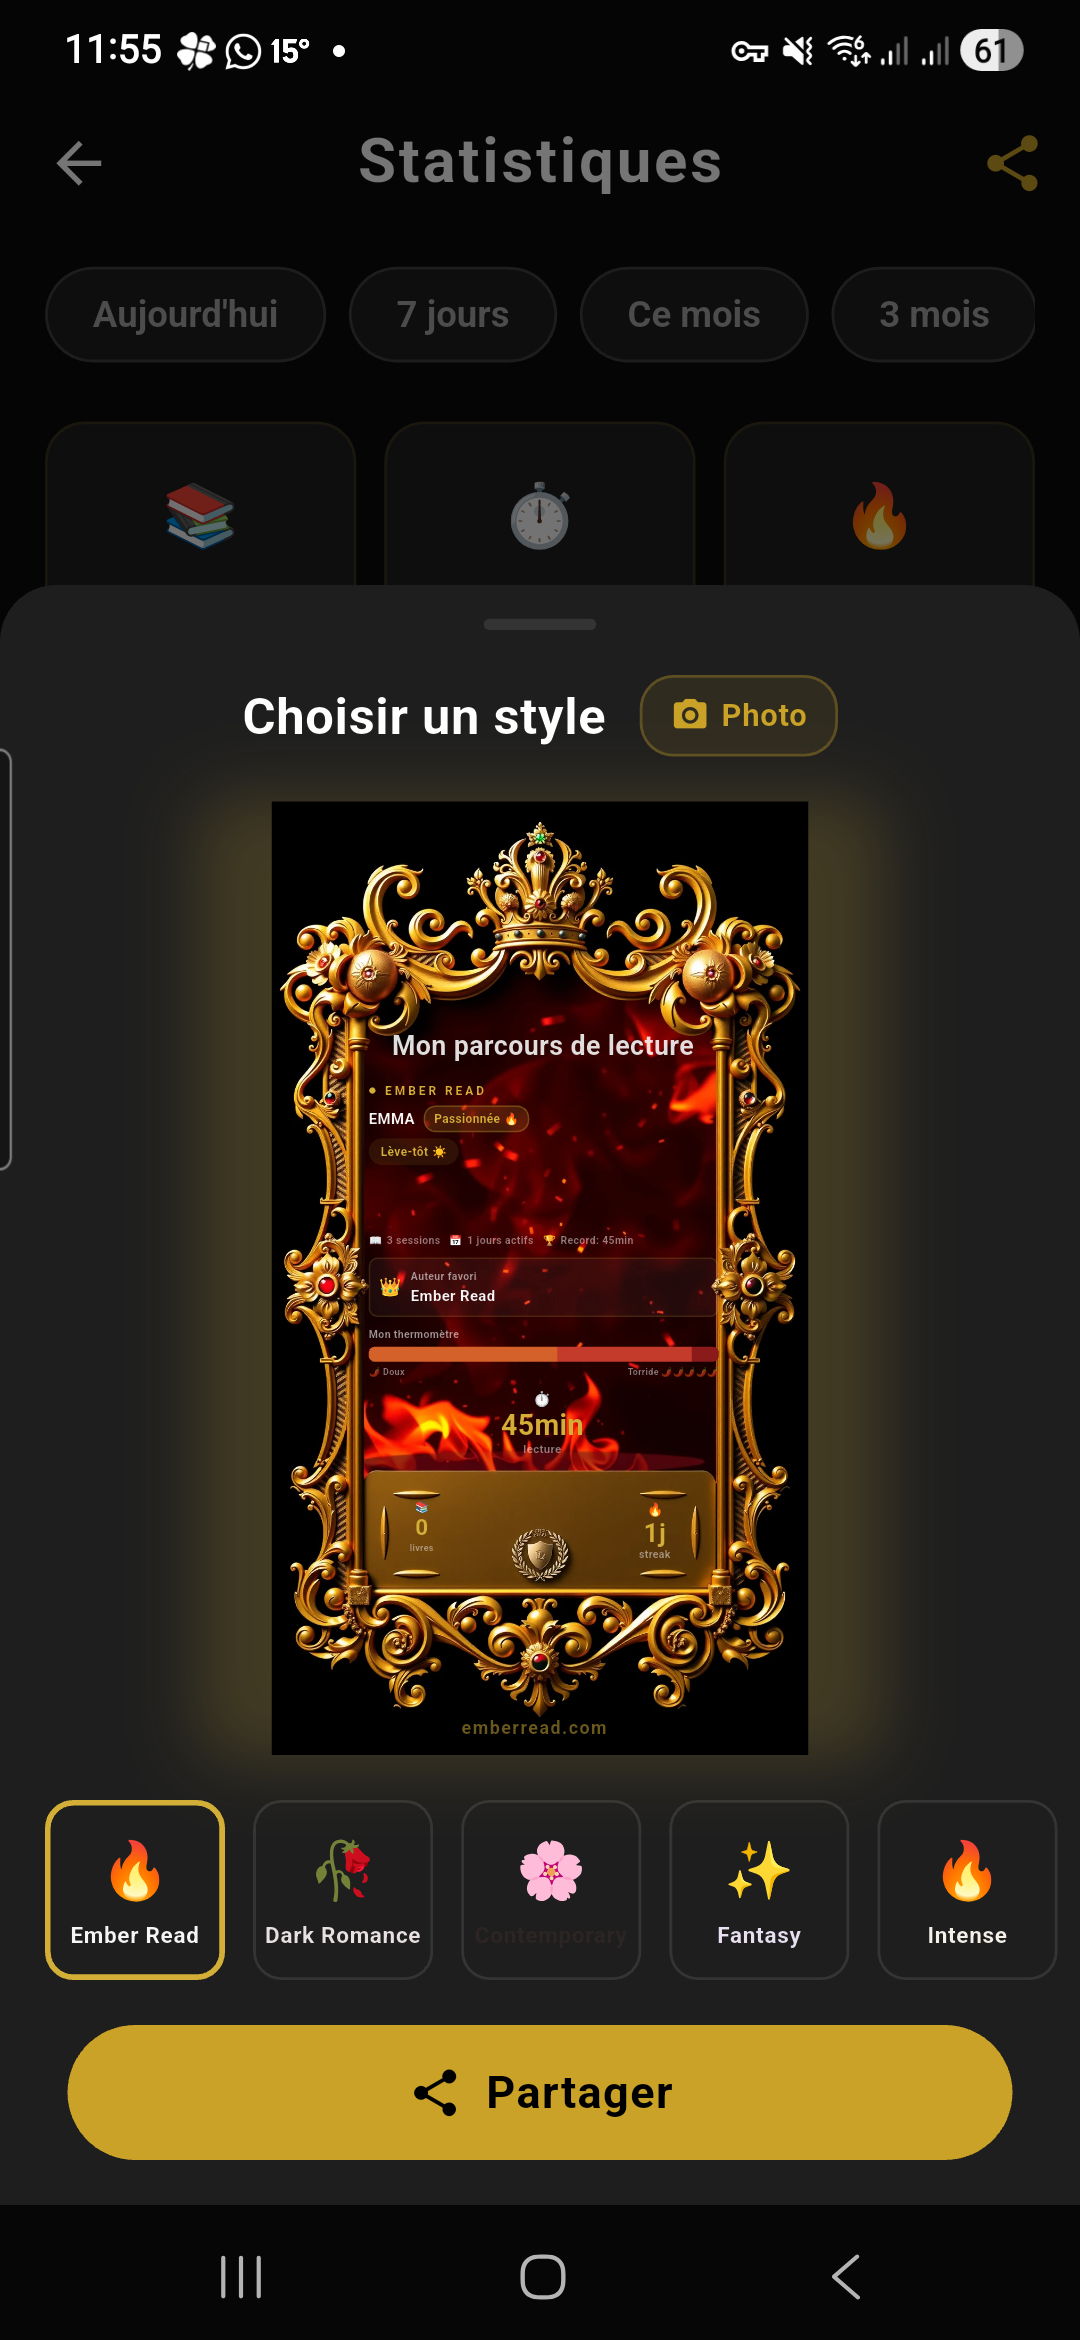
Shareable cards
How to create a card:
- In the Stats dashboard, tap the 📤 Share button in the top right
- A bottom sheet opens with the list of available templates — each template has a different visual style
- Select a template: the card preview is displayed full size
- The card automatically shows:
- Your username
- Your reader profile (icon + label)
- Your key stats: books read, total time, streak, favorite author
- The spice thermometer (intensity distribution)
- Avatar photo (optional): tap the avatar area to import a photo from your gallery. An artistic filter is applied (gold duotone, sepia, monochrome, etc.)
- Tap “Share”: the card is exported as a 9:16 image (story format) and the system share menu opens
Credits and subscriptions
Ember Read works with a credit system: each credit unlocks immersion mode (synchronized vibrations) for one book. Reading the text is always free — only immersion requires credits. Once unlocked, immersion stays active forever for that book. Credits never expire.
Our plans
Unlimited Pass: monthly subscription that unlocks immersion on all books without limit, plus premium features (advanced stats, Ember Wrapped, shareable cards, multi-device up to 4 toys, BookTree, detailed reader profile).
Buying credits or subscribing
| Platform | How to buy | Details |
|---|---|---|
| iOS | Directly in the app | Purchases go through Apple In-App Purchase. Prices may vary slightly depending on your country. |
| Android | In the app or on the web | You can buy in the app (Google Play) or at emberread.com/tarifs.html (Stripe payment, sometimes cheaper as there’s no store commission). |
Managing your subscription
| Platform | How to manage |
|---|---|
| iOS | iPhone Settings > your name (at the top) > Subscriptions > Ember Read. You can modify, cancel or renew your subscription there. |
| Android (web) | Log in at emberread.com/compte.html with the same email as your app account. You’ll find your subscription status and the cancellation button there. |
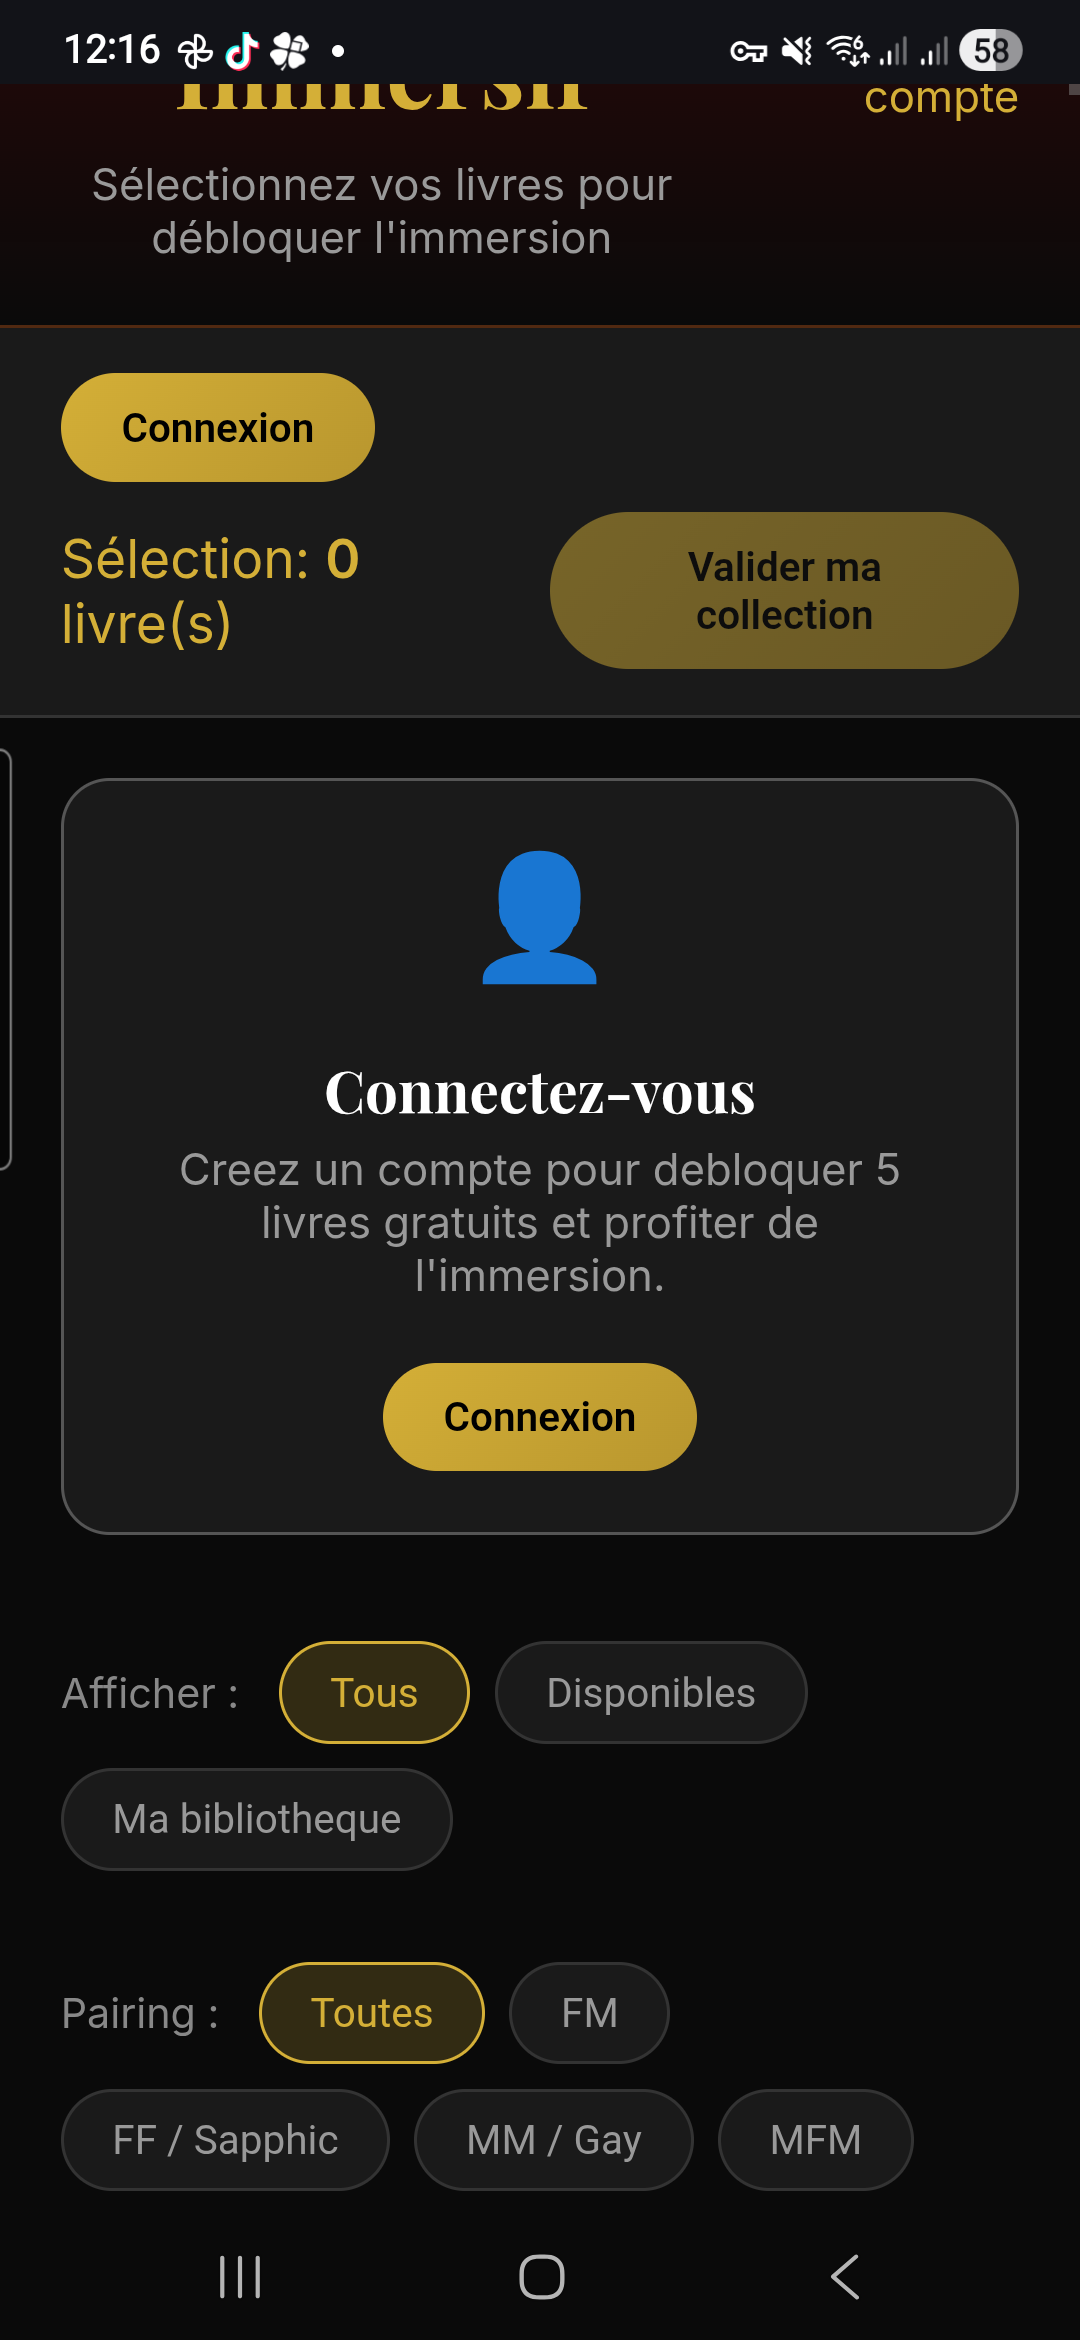
Starter Pack (welcome offer)
- On your first login (or if you’ve never used the Starter Pack), a popup offers you the deal
- The catalog opens with the label “Choose 5 books”
- Tap the covers to select them (a checkmark appears on each selected book)
- Once 5 books are chosen, tap “Confirm my selection”
- 3 credits are deducted and the 5 books are downloaded with immersion unlocked
Discovery Pass
If you have a Discovery Pass, here’s what you’ll see:
- A gold banner is displayed at the top of the screen with the text “Discovery Pass — X days remaining”
- A countdown (in days) shows you the time remaining
- All premium features are unlocked: unlimited immersion, advanced stats, Wrapped, multi-device, BookTree
- When the pass expires, you keep your stats and data, but premium features become locked again
Gift codes
Using a gift code:
- Go to Settings > Subscription > Use a gift code
- The screen shows 4 fields of 4 characters separated by dashes:
XXXX-XXXX-XXXX-XXXX - Enter the code (letters are uppercase, the cursor automatically moves to the next field)
- Tap “Validate”
- A confirmation message tells you what the code unlocked
Gift code types:
| Type | What it unlocks |
|---|---|
| Credits | Adds X credits to your account (e.g. 5, 10, 20 credits) |
| Subscription | Activates the Unlimited Pass for a given duration (e.g. 1 month, 3 months) |
| Specific book | Unlocks immersion for a specific book in the catalog |
Redeem a gift code on the website:
- Go to emberread.com/redeem (or click the link in the email)
- Log in to your account
- Enter the code in the 4 fields
- Click “Redeem my gift card”
Send a gift card:
- Go to emberread.com/cadeau
- Choose the type: Credits or Infinite Pass
- Fill in the details (your email, recipient’s email, a personal message)
- Pay by credit card
- The recipient receives an email with the code and a QR code
Promo codes
Promo codes are temporary promotions (launches, events, partnerships). Unlike gift codes, they use a free text field (not the XXXX-XXXX format).
- Go to Settings > Subscription > Promo code
- Enter the promo code in the text field
- Tap “Apply”
- If the code is valid, the discount is applied immediately (e.g. “-30% on Pack 10”)
- If the code is expired or invalid, an error message is displayed
Settings
The Settings tab (gear icon ⚙️, first tab on the main navigation bar) lets you customize the entire app. The page is laid out as a list of sections you can scroll through vertically.
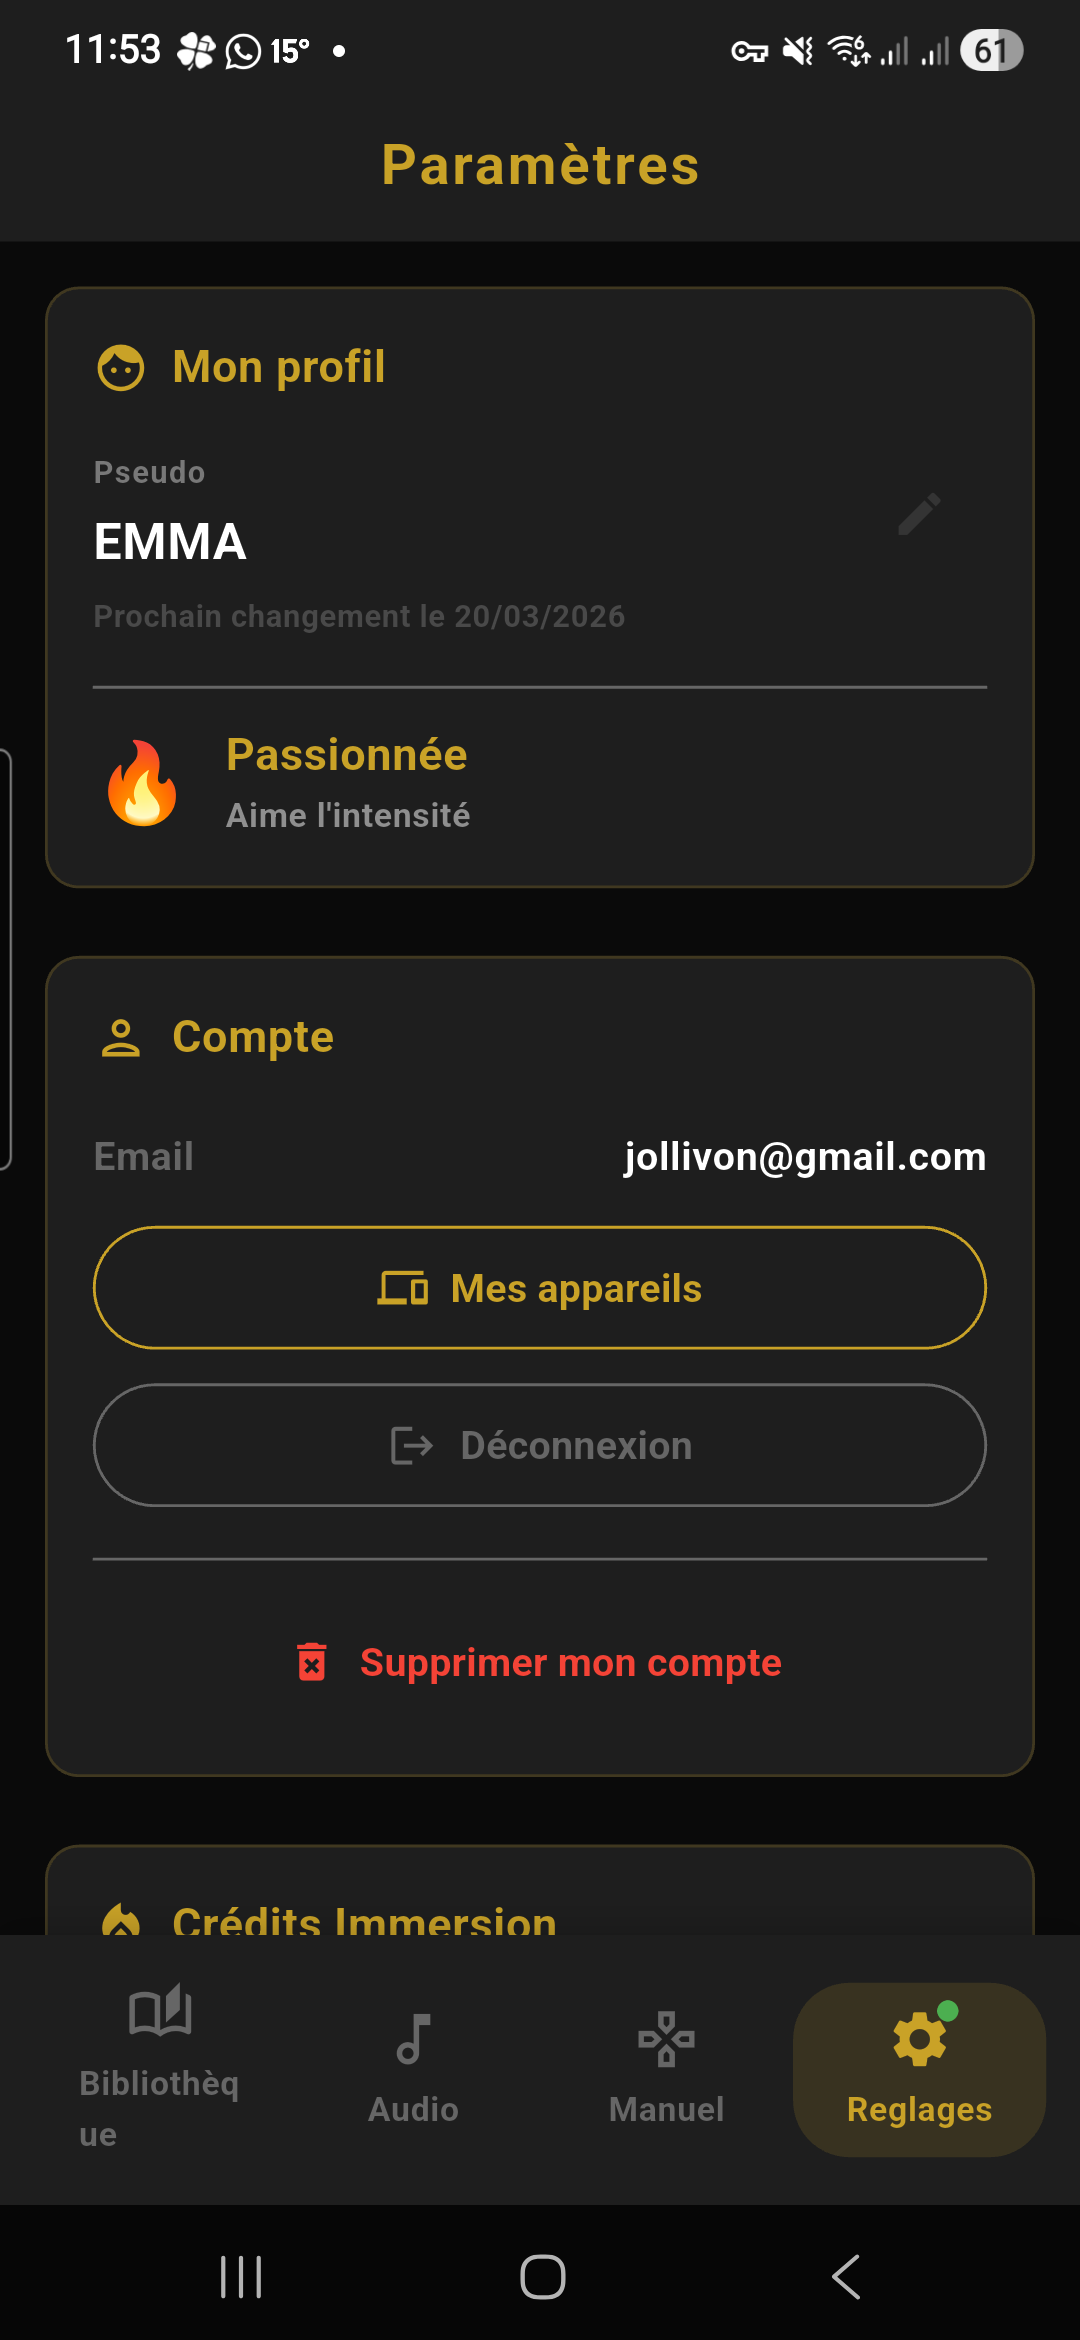
Profile
The first section at the top of the page:
| Element | Details |
|---|---|
| Avatar | A golden circle with your initials. Not editable (no profile picture in this version). |
| Username | Your display name, shown on shareable cards and in social reading sessions. Tap on it to edit. Rules: 20 characters max, editable once every 90 days (or 30 days with the Unlimited Pass). A message tells you when you can change it again. |
| Reader profile | Below your username, a line displays your profile icon (emoji) and your label (e.g. “🦊 Explorer”). Calculated automatically based on your reading habits. Premium only: free users see the label but not the details. |
App theme
Tap on “Theme” to choose from the available palettes. The “Sync” button checks whether new palettes are available on the server.
Account
| Element | Details |
|---|---|
| Email address | The email associated with your account. Not editable within the app. |
| My devices | Displays the list of phones linked to your account. Credits: 1 device maximum. Unlimited Pass: up to 2 devices. Tap on a device to remove it if you switch phones. |
| Log out | Logs you out of your account. Your imported books remain on the phone, but purchases and sync are no longer accessible. |
| Delete my account | Permanently deletes your account and all your data. Irreversible. A confirmation is required. |
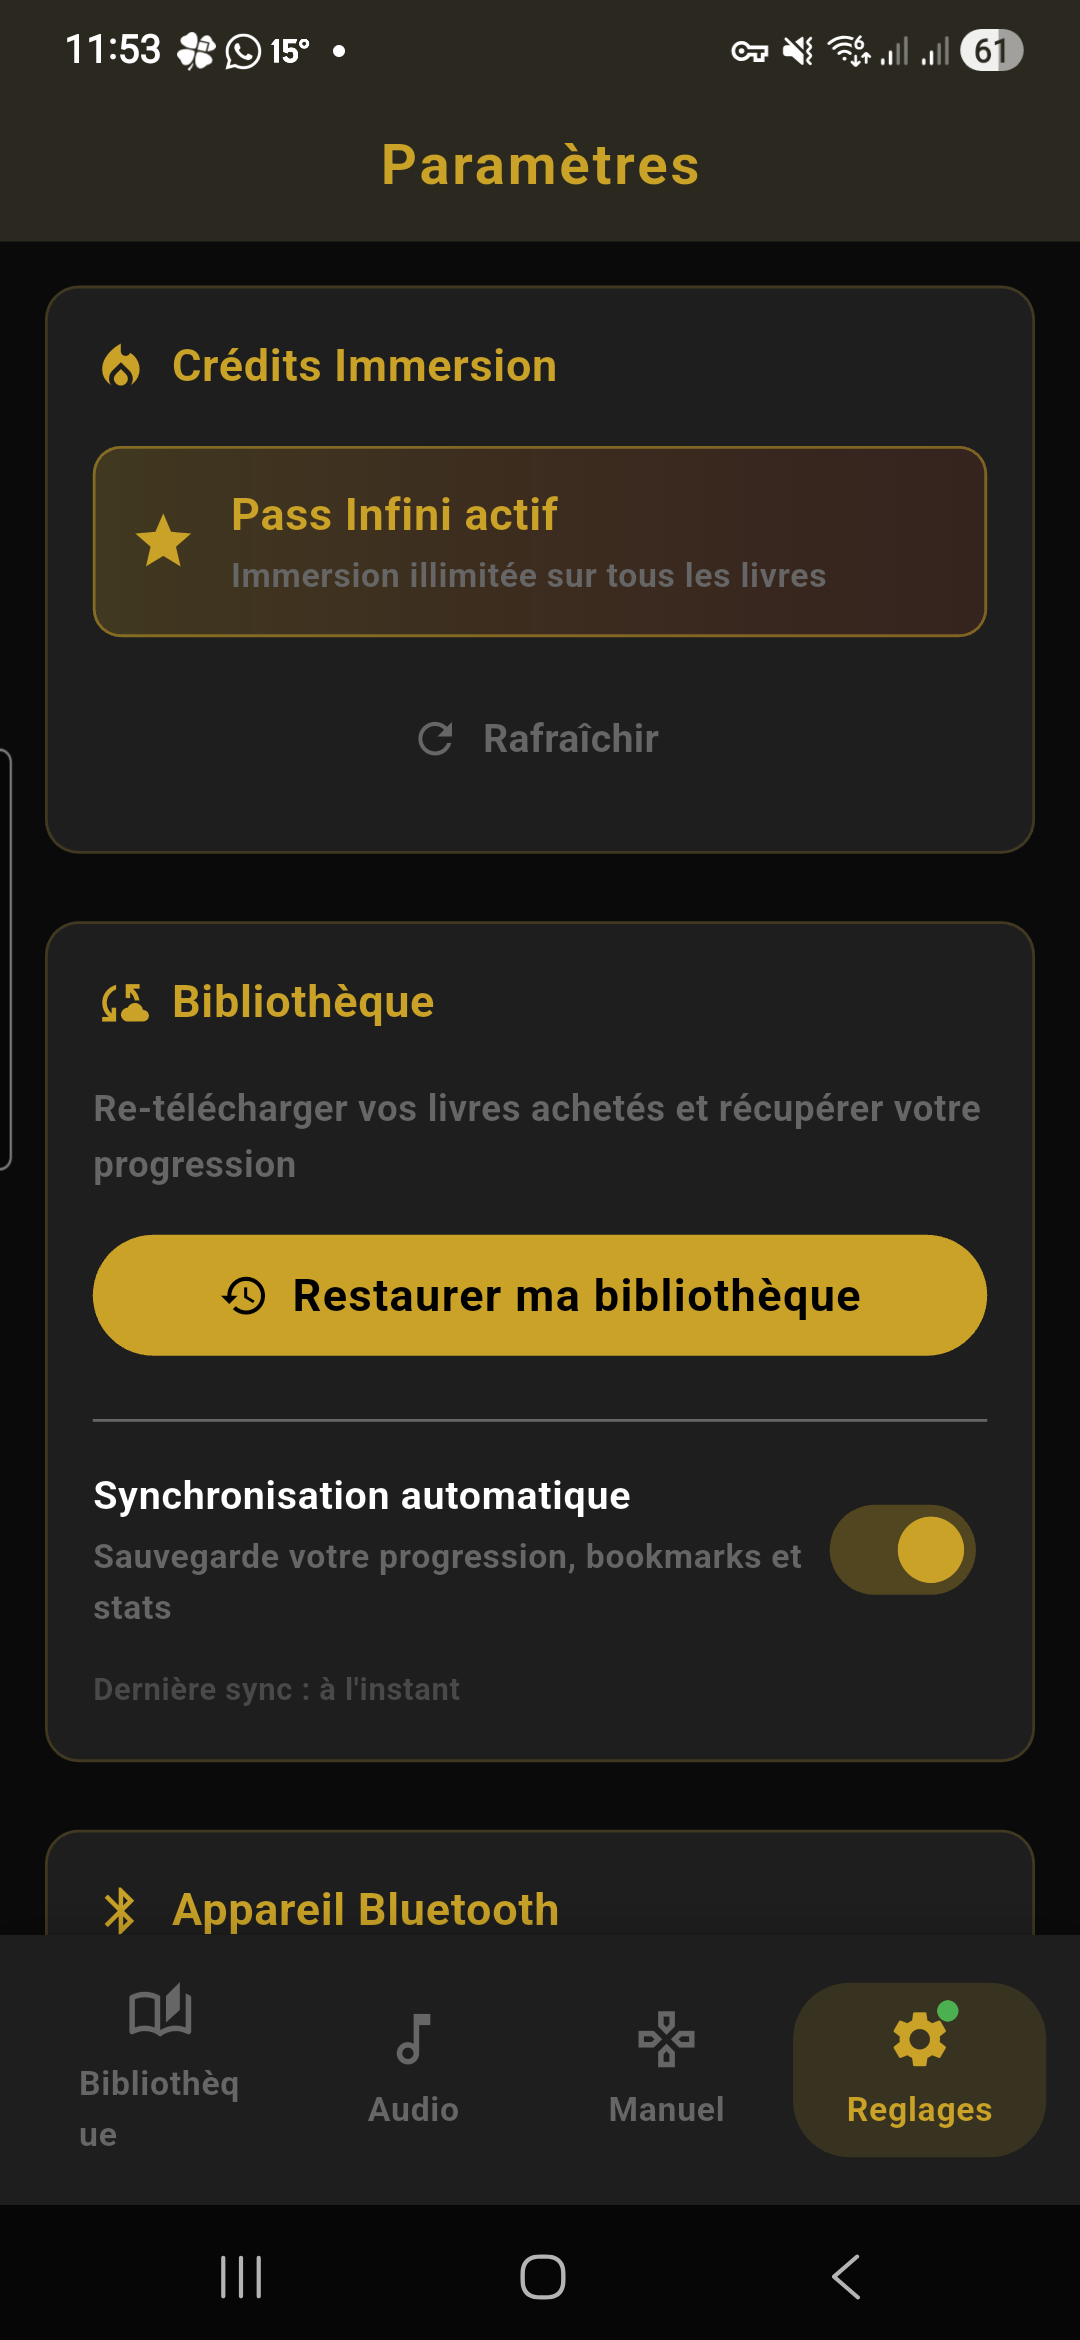
Subscription
| Element | Details |
|---|---|
| Status | Displays “Unlimited Pass” (golden badge) if subscribed, or “X credits remaining” if not subscribed. |
| Buy / Subscribe | Button to access credit packs and the Unlimited Pass (redirects to the in-app store on iOS, or to the web on Android). |
| Restore purchases | Button that re-checks with the App Store / Google Play whether you have any unsynced purchases. Useful after a reinstall. |
| Gift code | Opens the gift code entry screen (4 fields × 4 characters). See Credits section. |
| Promo code | Opens a free-text field to enter a promotional code. See Credits section. |
Intensity
A double slider (RangeSlider) lets you set:
- Minimum (left handle): the minimum vibration intensity. For example, set it to 20% to never go below that level.
- Maximum (right handle): the maximum vibration intensity. For example, set it to 60% for gentler vibrations, even during the most intense passages.
The range is displayed as a percentage (e.g. “20–80%”). It applies to all modes: immersion (reading), audio (music), and manual control.
Library
| Element | Details |
|---|---|
| Restore my purchases | Re-downloads all the books from the Ember Read catalog that you previously unlocked. Useful when you switch phones. |
| Auto sync | Toggle on/off. When enabled, your reading progress, bookmarks, annotations, and stats are saved to the cloud and synced across your devices. |
| Monthly goal | A slider from 0 to 50 books per month. The chosen value appears in the library header as a progress goal. Set to 0 to disable the goal. |
| Local transfer (P2P) | Opens the P2P transfer screen to send or receive your library over WiFi. See Transfer section. |
| BookTree history | List of all your previous BookTree scans. Swipe left on an item to delete it, or use the “Clear all” button. |
Accessibility
| Element | Details |
|---|---|
| Dyslexia mode | Enables the OpenDyslexic font throughout the reader, increases letter and word spacing, and adds a reading guide. Same setting as in the reading panel — both are synced. |
| Bionic Reading | Bolds the first half of each word in the reader. Same setting as in the reading panel. |
| Bold text | Makes all text bold in the reader. |
| Spacing | Increases the space between letters and words to improve readability. |
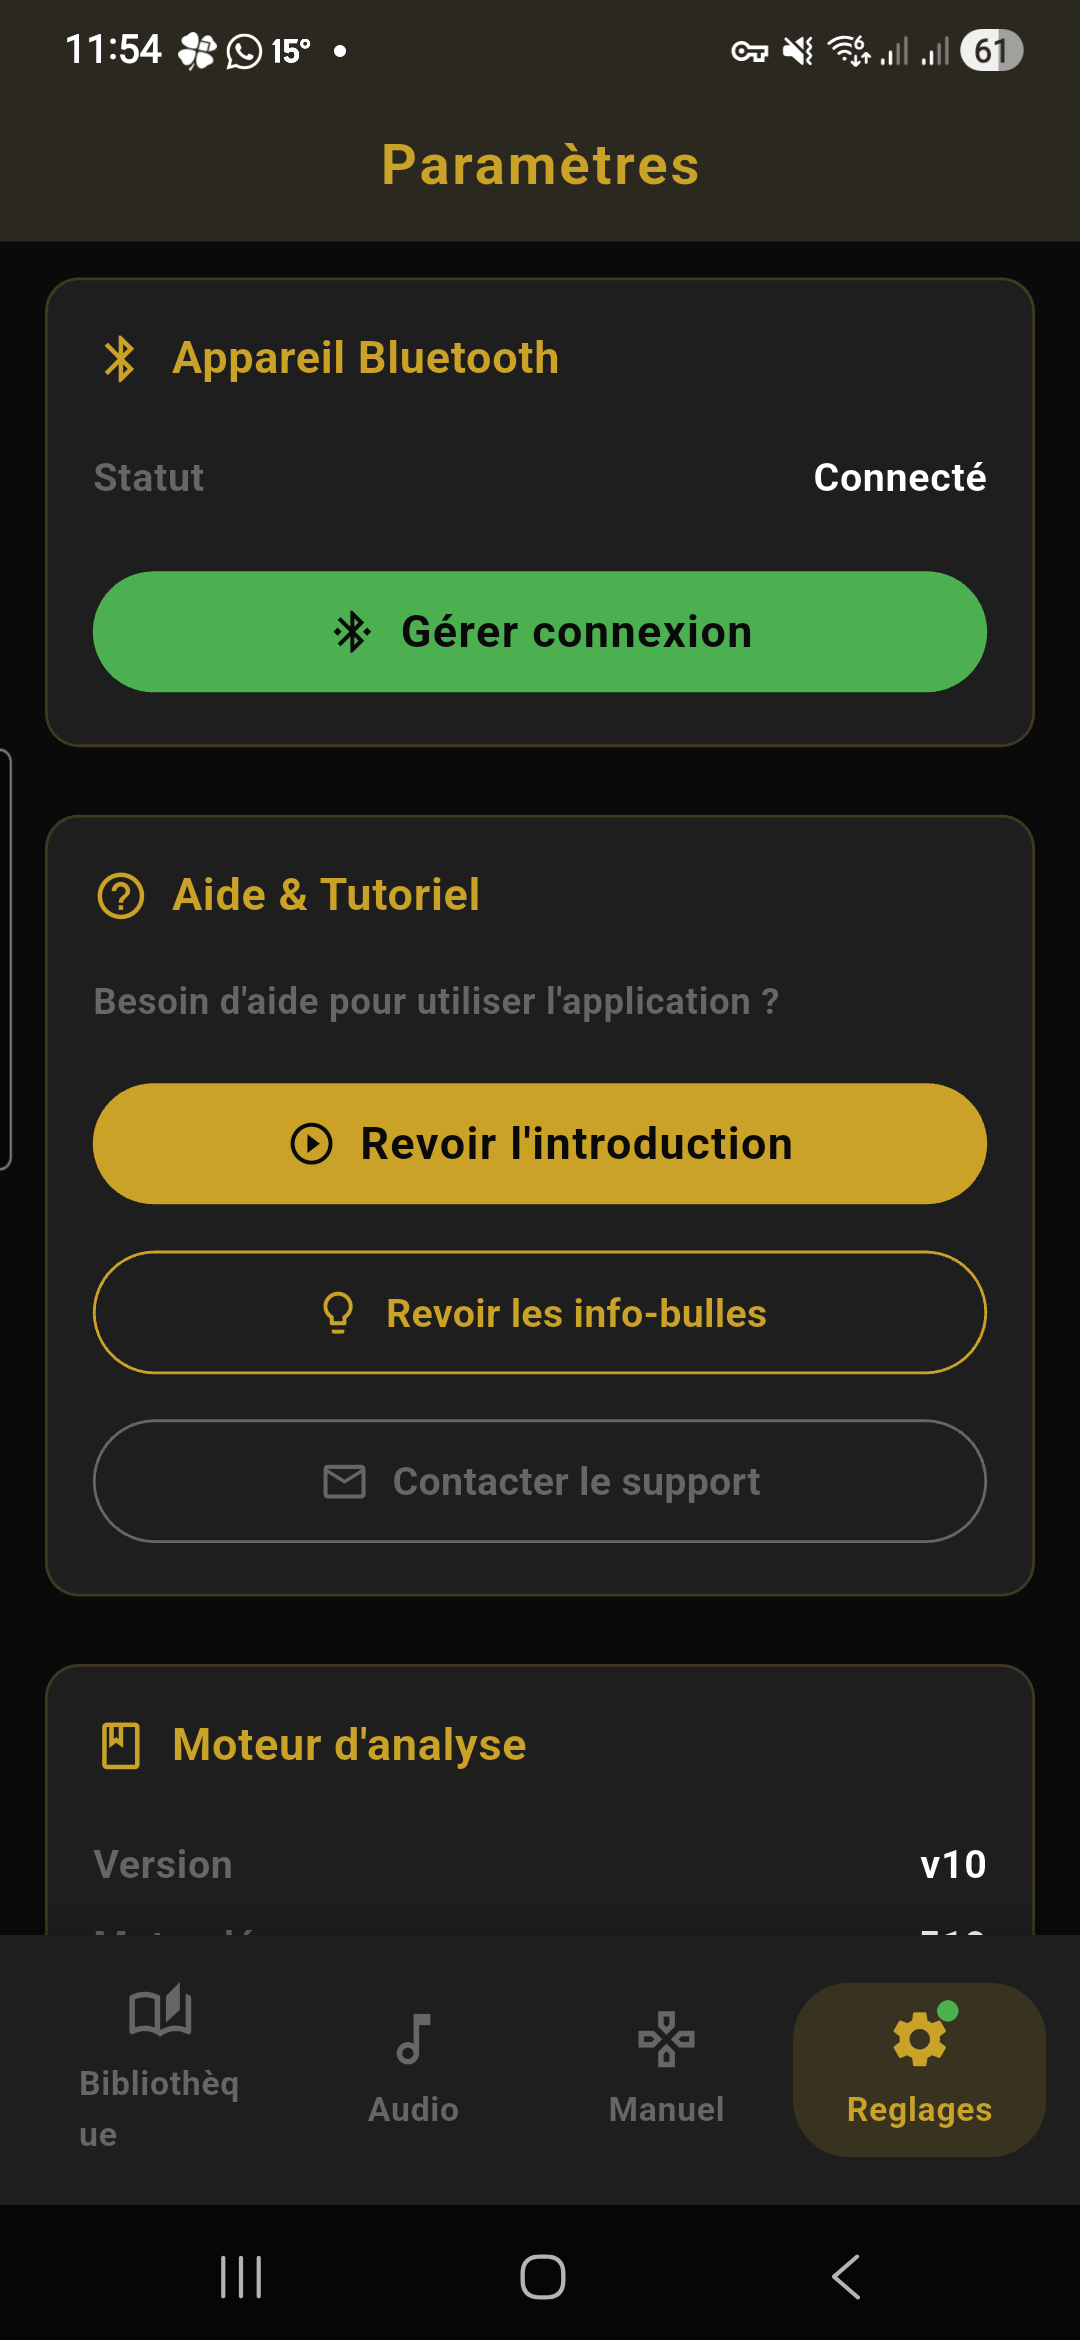
Bluetooth
| Element | Details |
|---|---|
| Connection status | Displays the name of the connected device and its icon (green Bluetooth). If no device is connected: grey icon “Not connected”. If multiple: “X toys connected”. |
| Battery level | If the device reports its battery level, it is displayed as a percentage with color coding: 🟢 green (>50%), 🟠 orange (20-50%), 🔴 red (<20%). |
| “Connect” / “Manage” button | If disconnected: golden “Connect” button that opens the Bluetooth scan screen. If connected: green “Manage” button that opens the management screen (disconnect, test, switch device). |
| Connection wizard | Link to the 4-step assistant for devices not automatically detected. See Immersion section. |
| Manual control | Link to the direct vibration control screen (sliders, patterns, 2D zone). |
Help
| Element | Details |
|---|---|
| User guide | Opens this guide directly inside the app (built-in webview). |
| Replay introduction | Restarts the onboarding tutorial (the welcome screens with explanatory bubbles). |
| Re-enable help bubbles | Restores the contextual help bubbles that appear the first time you use a feature. |
| Contact support | Opens a pre-filled email to support@emberread.com with your device’s technical info (app version, phone model, OS). |
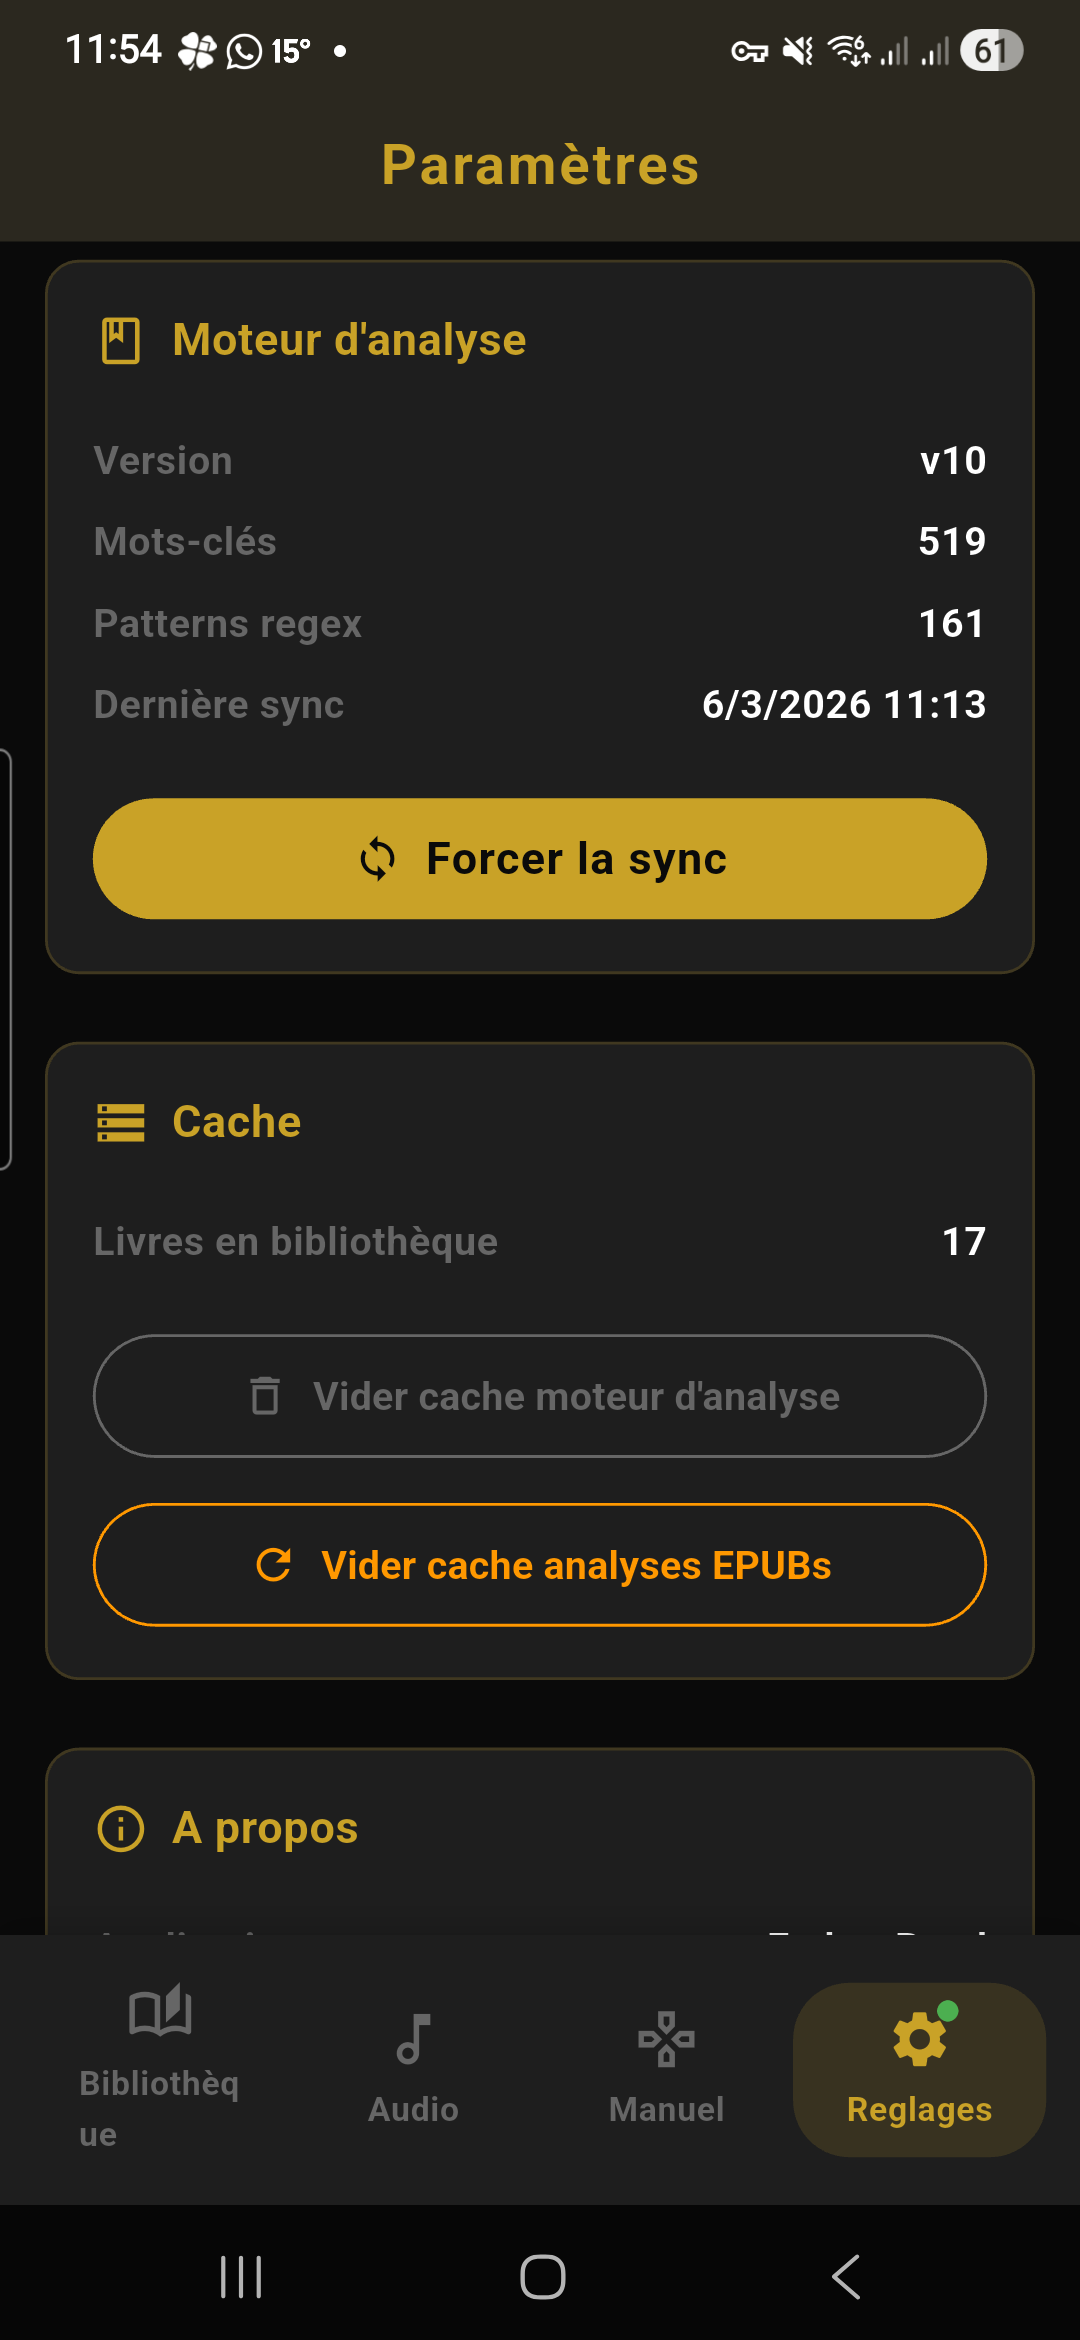
Analysis engine
| Element | Details |
|---|---|
| Dictionary version | Displays the version of the keyword dictionary used by the intensity analysis engine. The dictionary is updated regularly to improve detection. |
| Force sync | Downloads the latest dictionary version from the server, even if you are already up to date. Useful if you experience analysis issues. |
Cache
| Element | Details |
|---|---|
| Clear analysis cache | Deletes all analysis data (heatmap, keywords, tension curve) from your books. The books will be re-analyzed the next time they are opened. This does not delete the books themselves. |
About
| Element | Details |
|---|---|
| Version | App version number (e.g. v1.3.0+43). Share this with support if you experience an issue. |
| Terms of use | Opens the terms of use in a webview. |
| Privacy policy | Opens the privacy policy in a webview. |
BookTree — Book Discovery
Accessing BookTree
Two ways to open BookTree:
- From the library: tap the 🔍 magnifying glass icon in the header (top right of the search bar)
- Via sharing: from Instagram or TikTok, tap “Share” and choose Ember Read from the app list — the link is automatically sent to BookTree
Scan a social link
- Copy a link from Instagram (post, story, reel) or TikTok containing book covers
- Open BookTree (or share the link directly to the app)
- The app automatically detects the link in your clipboard and asks if you want to analyze it
- A loading indicator appears while the AI analyzes the images or video frames
- The AI identifies visible book covers and extracts titles and authors
- For each identified book, a resolution is performed via Open Library, Google Books, or DuckDuckGo to find complete information (HD cover, ISBN, description)
- Results are displayed in a vertical carousel (swipe up/down to navigate between books)
Manual search
If you already know the title or author of a book, you can do a manual search. The search screen opens on a dark background with the following elements:
| Element | Position | Details |
|---|---|---|
| App bar | Top | Title “Identify a book”, back arrow on the left. |
| Magnifying glass icon | Centered | 64px circle with light golden background (14% opacity), golden 🔍 magnifying glass icon in the center (32px). |
| Title | Below the icon | “Search for a book” (18px, bold, centered). |
| Subtitle | Below the title | Help text (13px, grey, centered) explaining how to use the search. |
| “Title” field | Form | “Title” label above the field. 📖 book icon on the left inside the field. Dark background, thin border. On focus: golden border (1.5px). The cursor is automatically placed in this field when the screen opens. |
| “Author” field | Below the Title field | “Author” label above the field. 👤 person icon on the left. Same style as the Title field. Optional field. |
| “Search” button | Full width | Solid golden button with white text (16px, bold). Rounded corners (14px). Pressing Enter in either field also triggers the search. |
| Footer | Bottom | Informational text (11px, grey, centered). |
Search button states
| State | Appearance | Condition |
|---|---|---|
| Normal | Golden button with “Search” text. | The Title field contains text. |
| Loading | Greyed-out button (not clickable) with a white spinner (20px) in the center replacing the text. | A search is in progress (resolution via Open Library, Google Books, DuckDuckGo). |
| Error | A red error message (13px) appears above the button. The button becomes clickable again. | The resolution failed (network issue, book not found, etc.). |
- Open BookTree and go to the search screen (magnifying glass icon).
- Enter the book title in the first field (required). Add the author name in the second field to refine results (optional).
- Tap “Search” or press Enter on the keyboard.
- A loading spinner appears during the resolution.
- Results are displayed the same way as for an automatic scan (see next section).
Results — navigating between books
Results are displayed in full screen on a dark background with a vertical carousel: swipe up to go to the next book. Scans are automatically saved to the history.
| Element | Position | Details |
|---|---|---|
| Source bar | Top (dark gradient) | On the left: back arrow (←, 18px). Then a golden dot (7px) glowing to indicate identification is active. Then the source: • If social scan: “Detected from” + “@handle” (name in bold, white). • If manual search: “Search results” (grey). Far right: counter badge rounded (dark background, thin border) showing “1 / 3”, “2 / 3”, etc. |
| Navigation rail | Right edge, vertically centered | Only visible if there are ≥2 books. Composed of: • Up arrow (▲, 22px, semi-transparent white) — visible if you are not on the first book. Tap to go up one book. • Vertical dots — one per book. The active dot is golden and larger (28px tall vs 16px). Inactive dots are semi-transparent white. Tap a dot to jump directly to that book. Dot width: 5px, rounded corners. • Down arrow (▼, 22px) — visible if you are not on the last book. • Compact mode (>12 books): only ~15 dots are displayed with a sliding window centered on the current book. Dots at the edges progressively shrink (fade effect). |
| Swipe hint | Bottom of 1st slide | Downward arrow (▼) + text “Swipe up to see more” (11px, grey). Visible only on the first book when there are multiple results. |
Book details — Page 1: Details
Each book is displayed in a full-screen slide with 2 horizontal pages (swipe left/right). The first page shows:
| Element | Details |
|---|---|
| Cover | Large image with a 3D effect (slight perspective tilt). Drop shadow and book spine effect on the left. |
| Confidence indicator | Badge below the cover with a colored dot: 🟢 Green (≥70%): “Identified from Google Books” — reliable identification. 🟠 Orange (<70%): “Low confidence — please verify” — the AI is not 100% sure. |
| Title | The full book title, in a serif font (Fraunces), large size. |
| Author | “By [author]” with the name in italics. |
| ISBN | The ISBN number if available (small text, grey). |
| Immersive block | If the book is in the Ember Read catalog: a card with an orange gradient, “IN CATALOG” badge, and a golden “Read in immersive mode” button that opens the book directly in the reader. If the book is not in the catalog: a card with a grey border and a “Get notified” button (to signal your interest). |
| Ember Read link | If the book is in the catalog, a “View on Ember Read” link provides access to details (reviews, rating). |
| TBR button | “Add to TBR” (bookmark icon + text). After adding, the button changes to “In TBR” (green with checkmark). Tap again to remove. |
| “Where to buy” link | Button at the bottom that slides to Page 2 (merchant links). Displays “Verify the book first” if confidence is low. |
Book details — Page 2: Where to buy
Swipe left from Page 1 to display the merchant links. A compact header (back arrow + mini cover + title/author) lets you return to Page 1.
| Merchant | Logo | Details |
|---|---|---|
| Fnac | F (golden) | Direct link to the Fnac book page. |
| Amazon | a (orange) | Direct link to the Amazon book page. |
| Cultura | C (red) | Direct link to the Cultura book page. |
| Lalibrairie.com | L (green) | Direct link to Lalibrairie.com. |
| Decitre | D (blue) | Direct link to the Decitre book page. |
Each merchant tile shows the price (if available) and a green “DRM-free” badge if the book is DRM-free at that merchant. DRM-free merchants are listed first. If a link to the author page (Babelio) exists, it appears below the merchants.
Scan history
BookTree keeps a history of all your previous scans. To access it:
- From the library: tap the 🕓 clock icon in the header
- From settings: go to Settings > Library > BookTree history
History screen
| Element | Position | Details |
|---|---|---|
| App bar | Top | Title “History”, back arrow. On the right: 🗑 broom icon (clear all). A small spinner (16px) appears next to it when the app is automatically enriching incomplete books (missing covers). |
| Empty state | Centered | If no scans: 🕓 clock icon (48px, grey) + text “No scans” (14px, grey). |
| Scan list | Page body | Each scan is a row separated by a thin line. |
Each history item displays:
| Element | Details |
|---|---|
| Thumbnail cover | On the left: book image (40×56px, rounded corners 6px). If no cover: dark background with 📚 open book icon. |
| Title | Book title (14px, semi-bold). Truncated to 1 line. |
| Author | Author name (12px, grey). Truncated to 1 line. |
| Time elapsed | Displayed as relative time (11px, light grey): • “Just now” (< 1 min) • “X min” (< 1 hour) • “X hours” (< 1 day) • “X days” (< 1 week) • “MM/DD/YYYY” (≥ 1 week) |
| Chevron | “>” arrow (18px, grey) on the far right (hidden in selection mode). |
Actions on a scan
- Tap on a scan: reopens the BookTree results screen for that book (real-time re-resolution).
- Swipe left: the background turns light golden with a trash icon — release to delete (immediate deletion, no confirmation).
- Long press: enters selection mode.
Selection mode
After a long press, the interface changes:
| Element | Details |
|---|---|
| Bar title | Replaces “History” with “X selected”. |
| Back button | Replaced by a ✕ that exits selection mode. |
| Checkmarks | To the left of each item: empty circle (unselected) or filled golden checkmark (selected). Selected items have a light golden background. |
| “Select all” icon | Top right: ☑ icon (22px). Tap to select all items (or deselect all if everything is already checked). |
| Delete icon | Next to “Select all”: 🗑 trash icon (22px). Tap to delete selected items (a confirmation dialog appears: “Delete X item(s)?” with “Cancel” / “Delete”). |
Clear all history
In normal mode, tap the 🗑 broom icon at the top right. A confirmation dialog appears with “Cancel” / “Delete”. The deletion is permanent.
P2P Transfer
Prerequisites
Send (source phone)
- On the phone that contains the library, go to Settings > Library > Local transfer.
- Tap the “Send” button.
- The “Send” screen opens and goes through several states (see below).
- Wait for the second phone to scan the QR code or connect.
Send screen states
| State | Appearance | Details |
|---|---|---|
| Starting | Centered text | “Starting the server...” while the app creates the local WiFi server. |
| Ready | QR code + IP | The screen displays from top to bottom: • A large QR code (220px) in a rounded white frame (16px), containing the connection address in the format emberread://IP:PORT.• The IP:port address in monospace font within a frame with a WiFi icon (📶) and a golden border (e.g. “192.168.1.42:8080”). • “X book(s) available” (grey text). • 3 numbered instruction lines (circles 1, 2, 3) explaining the procedure for the other device. • “Waiting for connection...” with a spinner. |
| Transfer in progress | Sync icon + text | Golden 🔄 sync icon + “Transfer in progress...” + “A device is downloading your books”. |
| Error | Error icon + message | ⚠️ error icon + error message + “Retry” button. |
Receive (destination phone)
- On the phone that should receive the library, go to Settings > Library > Local transfer.
- Tap the “Receive” button.
- The “Receive” screen opens with two distinct zones:
Zone 1: Auto-discovery
| Element | Details |
|---|---|
| Spinner + text | “Searching...” (golden, 15px, bold) with a spinning loader. The app uses mDNS to discover Ember Read servers on the local network. |
| Status | “No device found yet” while nothing is detected. Changes to “X device(s) found” when a server responds. |
| Device tile | For each detected device: • On the left: 📱 phone icon in a rounded golden frame. • In the center: device name (15px, semi-bold) + “X book(s) available” (12px, grey). • On the right: “>” arrow. Tap the tile to connect to that device. |
Separator
A horizontal line with the text “or” in the center separates the two zones.
Zone 2: Scan the QR code
| Element | Details |
|---|---|
| QR button | Golden outline button with 📷 QR scanner icon and text “Scan the QR code”. Full width. |
| Camera modal | Pressing the button opens a panel covering 70% of the screen from the bottom. It contains: • Handle (horizontal bar 40×4px, grey, centered) for drag-to-close. • Text: “Scan the QR code displayed on the other device”. • Camera view with automatic detection. As soon as a valid QR code (private IP address) is detected, the connection is established and the panel closes. |
Error message
If the connection fails, a red banner appears with the error message and a refresh icon (🔄) to retry.
Book selection screen
After connecting to the source device, the “Selection” screen displays the list of available books:
| Element | Position | Details |
|---|---|---|
| App bar | Top | Title “Selection”. |
| Header | Below the bar | “X book(s) available” on the left. On the right: “Select all” link (or “Deselect all” if everything is checked). |
| Book tile | Scrollable list | For each book: • Checkbox (24×24px): grey outline (unchecked) or golden fill with white checkmark ✓ (checked). Tap to check/uncheck. • Title (15px, semi-bold). • Author (12px, grey). • File size (12px, grey): automatically formatted in B, KB, or MB depending on size. |
| Download button | Bottom | Solid golden button: ⬇️ download icon + “Download (X)” (black text). Disabled if no books are selected. |
Transfer screen
After tapping Download, the bar title changes to “Transfer” and the screen shows the progress:
| Element | Position | Details |
|---|---|---|
| Progress header | Centered at top | Golden 🔄 sync icon (40px) + counter “X/Y” (24px, bold) + “books transferred” (13px, grey). If there are failures: “X failure(s)” in red. |
| Per-book tile | List | For each book being transferred: • Status icon: golden ⬇️ (in progress) / green ✅ (completed) / red ❌ (failed). • Title (14px). • Progress bar (4px, golden) below the title, or “Failed” text (11px, red) if error. • Percentage (13px) on the right. |
| Cancel button | Bottom | “Cancel” (red text). Interrupts the transfer — books already received are kept. |
Transfer complete screen
When the transfer finishes:
| Element | Details |
|---|---|
| Success icon | Large green checkmark ✅ (56px) in a light green circle. |
| Counter | “X book(s) imported” (20px, bold). |
| Failures | If some books failed: “X book(s) failed” (red text). |
| Message | “Your books are now in your library”. |
| Return button | “Back to library” (solid golden button). |
In case of a critical error (WiFi disconnection, server stopped): ⚠️ error icon (48px) + message + “Back” button.
Transferred content
| Data | Transferred? |
|---|---|
| EPUB / .eread files | ✅ Yes |
| Bookmarks | ✅ Yes |
| Annotations (highlights + notes) | ✅ Yes |
| Reading progress | ✅ Yes |
| Analysis data (heatmap) | ✅ Yes (if already analyzed) |
| Reading statistics | ❌ No (synced via the cloud) |
| App settings | ❌ No |
Soundscapes
How it will work
Ember Read's analysis engine already detects the emotional context of each passage. Soundscapes will go further by also identifying the setting and atmosphere described in the text:
- A scene on the beach? You'll hear waves and seagulls
- A chapter in a forest? Rustling leaves, birdsong, wind
- An intimate moment in a bedroom? Creaking wood, hushed silence
10 planned soundscapes
| Soundscape | Sounds |
|---|---|
| 🏖️ Beach | Waves, sea breeze, seagulls |
| 🌲 Forest | Birds, rustling foliage, stream |
| 🏙️ City | Urban hum, light traffic |
| 📚 Library | Turning pages, whispers, clock |
| 🛏️ Bedroom | Hushed silence, creaking, fabric |
| 💼 Office | Keyboard, ventilation, calm ambiance |
| 🌻 Garden | Insects, gentle breeze, wind chimes |
| 🪨 Cave | Water drops, echoes, resonance |
| 🌧️ Rain | Rain on windows, distant thunder |
| 🌙 Night | Crickets, owls, nighttime silence |
Transitions
Transitions between soundscapes will use a crossfade effect — one sound gradually blends into the next for a seamless, natural immersion. No abrupt cuts.
Activation
Soundscapes will be accessible via the “Sound” chip (headphone icon) in the secondary panel of the reader's bottom bar. Activating TTS will automatically pause the soundscape.
Synchronization
Your library is automatically synchronized:
- Reading progress
- Bookmarks and annotations
- Statistics
Synchronization is triggered automatically when you close a book, when the app goes to the background, or when you add/remove a bookmark.
Troubleshooting
Bluetooth can't find my device
- Make sure Bluetooth is enabled on your phone (in system settings)
- Make sure your vibrating device is turned on and charged (indicator light active)
- Make sure it is not connected to another app (Satisfyer Connect, Lovense Remote, Svakom, etc.). Close these apps completely before using Ember Read.
- Some devices require a specific pairing mode: check your toy's user manual to put it in discovery mode
- Toggle Bluetooth off and back on on your phone
- On iOS: go to iPhone Settings > Ember Read and verify that Bluetooth is allowed
- On Android: go to Settings > Apps > Ember Read > Permissions and verify that “Nearby devices” and “Location” are allowed
- If nothing works, use the Connection Wizard (Settings > Bluetooth > Wizard) which offers a targeted scan for your brand
Vibrations are not working
- Check that the device is connected (green Bluetooth icon in the reader's More tab, or in Settings > Bluetooth)
- Check that the “Toys” chip is active (highlighted in gold) in the reader's bottom bar. If it is not visible, tap the ▼ expand button to open the secondary panel.
- Check the intensity range in Settings > Intensity — if both minimum and maximum are set to 0%, vibrations will be invisible
- Check that the book has been analyzed — an unanalyzed book will not trigger vibrations. Analysis is indicated by a circular progress indicator on the cover. If it is stuck, clear the analysis cache (Settings > Cache) and reopen the book.
- Make sure the reading line is on a text area (not on an image or empty space)
- Test your device via manual control (Settings > Bluetooth > Manual control) to verify it is working
Book analysis is stuck
- Check your internet connection — analysis requires a connection for the initial processing
- Clear the analysis cache: go to Settings > Cache > Clear cache
- If the analysis is still stuck, delete the book and re-import it
- If the problem persists, the EPUB file may be corrupted. Try downloading it again from your source.
How to use Demo mode (phone vibrator)
Demo mode (also called PhoneVibrator) uses your phone's built-in vibrator instead of a Bluetooth toy. It's perfect for trying out immersion mode without a toy.
- Open a book in the reader
- Tap the center of the screen to display the menu
- In the bottom bar, tap the ▼ expand button
- Tap the “Demo” chip (phone icon)
- The chip turns gold and moves up to the main controls row
- Vibrations now come through your phone's vibrator in sync with the text
- To deactivate, tap the “Demo” chip again
Text-to-speech (TTS) is not working
- Check your audio output: TTS is blocked on speakers and loudspeakers. You must use headphones, earbuds, or car audio (see the TTS section for the full list).
- Check that voices are installed on your phone:
- Android: System Settings > System > Languages & input > Text-to-speech > download a voice for your language
- iOS: Settings > Accessibility > Spoken Content > Voices > download an “Enhanced” voice for better quality
- Check that TTS is enabled: in the TTS settings (tap the speed badge), the “Enable TTS” toggle must be ON
- If the message “Not available with your plan” appears, TTS may be reserved for certain plans
How to use BookTree
- Make sure you have an Unlimited Pass subscription (BookTree is premium)
- Method 1: copy an Instagram or TikTok link, open the library, tap the 🔍 magnifying glass icon in the top right
- Method 2: from the Instagram or TikTok app, tap “Share” and choose Ember Read
- Method 3: open BookTree and use manual search by entering a title and/or an author
- See the BookTree section for full details
I can't find my books after switching phones
- Sign in with the same account (same email) on your new phone
- Go to Settings > Library > Restore my purchases to re-download books from the Ember Read catalog
- For your imported books (personal EPUBs), use P2P Transfer (Settings > Library > Local transfer) from your old phone. Both phones must be on the same WiFi network.
- Your stats, bookmarks, and annotations are synced via the cloud — they will appear automatically if sync is enabled
My vibrating device's battery
- The battery indicator appears in the top right of the reader when immersion mode is active: 🟢 green (>50%), 🟠 orange (20-50%), 🔴 red (<20%)
- If your device suddenly stops during reading, it is probably out of charge
- Not all devices report their battery level: this is the case with some older Satisfyer models. The indicator simply won't appear.
- Generally, a fully charged toy provides 1 to 2 hours of use in vibration mode
My annotations have disappeared
- Check that synchronization is enabled: Settings > Library > Automatic synchronization
- If you cleared the analysis cache, your annotations are not deleted — they are stored separately
- If you deleted and re-imported a book, annotations from the previous import are not automatically reattached
Bionic Reading or Dyslexia mode is not applying
- Check that the toggle is enabled in the “Layout” tab of the reader settings panel
- Bionic Reading and Dyslexia mode are reader settings, not app settings. They only apply to the text of the book currently being read.
- Both settings are persistent: once enabled, they remain active for all books
The app is requesting permissions
| Permission | Why | Required? |
|---|---|---|
| Bluetooth | To connect and control vibrating toys | No (but immersion mode won't work without it) |
| Location | Required by iOS for Bluetooth Low Energy scanning. Ember Read does not collect your location. | Yes on iOS for Bluetooth |
| Microphone | Only for audio mode (ambient sound analysis to synchronize vibrations) | No (audio mode is optional) |
| Camera | Only for P2P Transfer (QR code scanning) | No (you can enter the IP manually) |
| Files | To import EPUB files from your phone | Yes (otherwise you cannot import books) |
Contacting support
If your issue is not resolved by the solutions above:
- Email: support@emberread.com
- From the app: Settings > Help > Contact support (sends a pre-filled email with your technical information)
- Always include: your phone model, the app version (visible in Settings > About), and a description of the issue
Social Reading
Accessing Social Reading
Open a book in the reader, then access Social Reading from the menu. The “Social Reading” screen appears with the book title at the top, and two cards below:
Active club list
Below the “Book Club” card, the “My clubs” section lists your clubs. Each club is displayed as a tile:
Tap a club to open its detail screen.
Book Club — Create a club
Book Club — Join a club
Book Club — Detail screen
When you create or open a club, the detail screen displays:
Pull down to refresh positions (pull-to-refresh).
Progress cursors
On the progress bar, each participant is represented by a small colored circle (12px) positioned according to their percentage of progress through the book:
Participant tile
Each club member is displayed in the list with:
Leave a club
Live Reading — Create a session
Live Reading — Join
Session bar in the reader
When a Live session is active, a compact bar (32px tall) appears at the top of the reader:
Presence overlay (Book Club)
When you are reading a book for which you have an active book club, a presence panel appears on the right edge of the reader. It displays the other members’ positions in real time.
Collapsed state (default)
A narrow strip (36px) attached to the right edge of the screen, with rounded corners on the left:
Tap the strip to expand the panel.
Expanded state
The panel widens to 185px with a slight shadow:
• Mini avatar (18px) on the left
• Name (11px) + current chapter (9px, grey) in the center. Your name appears as “Me” in golden bold.
• On the right: percentage in golden (12px, bold) + difference relative to your position (e.g. “+12%” in green if ahead, “-8%” in orange if behind, “=” in grey if at the same spot).
Tap on the panel to collapse it.
Position updates